背景
最近想改下ragflow的源码和研究下大模型。好好的整理下环境。
以前写过python,项目不大,也就几个项目,一般都用python自带的venv做环境管理,单一的python还好一些,我之前安装的是3.9(比较早了)。而有些项目需要3.10,有的需要3.11,有的需要3.12,要么升级,要么安装多套环境。有时候一不注意好几个项目就混合共用一个虚拟环境,然后就是各种版本冲突。
后来安装了anaconda,个人感觉还是有点重了,趁着这次跑微调以及ragflow源码的修改。使用minicoda重新整理了一遍。
我让chatgpt帮我对比了下优缺点。
|
|
venv + pip |
conda |
|---|---|---|
|
|
|
|
|
|
|
|
|
|
|
|
|
|
|
|
|
|
|
environment.yml |
速度慢,在于解析查找,安装完以后都一样。
本文篇幅交行,我简单的列下本文大纲。
-
pip 环境 -
minconda3安装 -
conda常用操作 -
ragflow win10环境配置 -
ragflow后端启动 -
ragflow前端启动 -
ragflow登录界面和图标修改
环境清理


pip推荐
全局设置
只要我们设置一次,以后就一直生效。选择一个设置即可。
#阿里pip镜像
pip config set global.index-url https://mirrors.aliyun.com/pypi/simple

#清华pip镜像
pip config set global.index-url https://pypi.tuna.tsinghua.edu.cn/simple

#腾讯pip镜像
pip config set global.index-url http://mirrors.cloud.tencent.com/pypi/simple

#豆瓣pip镜像
pip config set global.index-url http://pypi.douban.com/simple/

#网易pip镜像
pip config set global.index-url https://mirrors.163.com/pypi/simple/

pip config set global.index-url https://mirrors.aliyun.com/pypi/simple
Writing to C:UsersyxkongAppDataRoamingpippip.ini
临时使用
不想设置全局,可以在安装的时候,临时设置一个。
pip install numpy -i https://pypi.tuna.tsinghua.edu.cn/simple/
使用pip的时候在后面加上-i参数,指定pip源:
miniconda3安装
官方网址: https://docs.conda.io/projects/conda/en/stable/index.html
国内镜像 https://mirrors.tuna.tsinghua.edu.cn/anaconda/miniconda/
unbuntu 22 安装
在unbuntu中,下载以后,直接执行下面的命令即可。
sh Miniconda3-latest-Linux-x86_64.sh
按照提示,回车-> yes->数据安装目录(可选),不输入直接回车->yes
Welcome to Miniconda3 py312_25.1.1-2

In order to continue the installation process, please review the license
agreement.
Please, press ENTER to continue
>>>
ANACONDA TERMS OF SERVICE

Do you accept the license terms? [yes|no]
>>> yes

Miniconda3 will now be installed into this location:
/home/yxkong/miniconda3

  - Press ENTER to confirm the location
  - Press CTRL-C to abort the installation
  - Or specify a different location below

[/home/yxkong/miniconda3] >>> /opt/app/miniconda3
PREFIX=/opt/app/miniconda3

You can undo this by running `conda init --reverse $SHELL`? [yes|no]
[no] >>> yes
no change     /opt/app/miniconda3/condabin/conda
no change     /opt/app/miniconda3/bin/conda
no change     /opt/app/miniconda3/bin/conda-env
no change     /opt/app/miniconda3/bin/activate
no change     /opt/app/miniconda3/bin/deactivate
no change     /opt/app/miniconda3/etc/profile.d/conda.sh
no change     /opt/app/miniconda3/etc/fish/conf.d/conda.fish
no change     /opt/app/miniconda3/shell/condabin/Conda.psm1
no change     /opt/app/miniconda3/shell/condabin/conda-hook.ps1
no change     /opt/app/miniconda3/lib/python3.12/site-packages/xontrib/conda.xsh
no change     /opt/app/miniconda3/etc/profile.d/conda.csh
modified      /home/yxkong/.bashrc

==> For changes to take effect, close and re-open your current shell. <==

Thank you for installing Miniconda3!
可以看到最后有一个/home/yxkong/.bashrc
验证下
(base) yxk@yxkong:~$ conda -V
conda 25.1.1
win10 安装

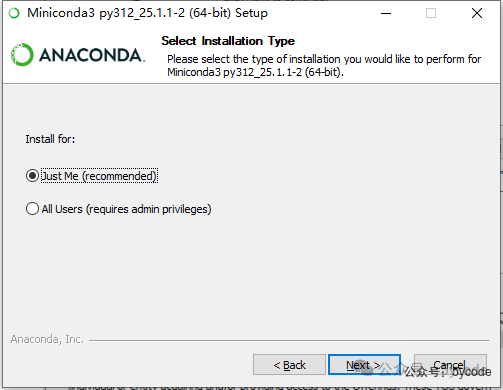
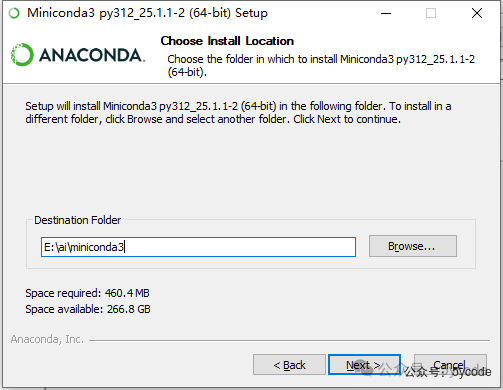 设置安装目录
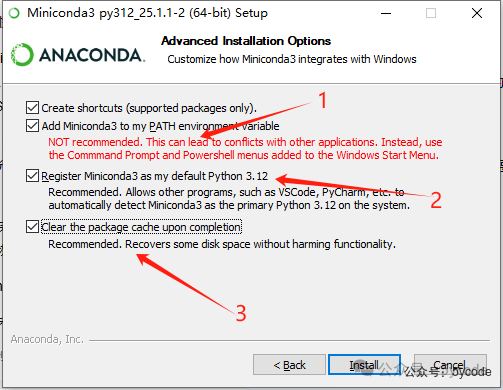
-
将Miniconda3添加到环境变量里,官方不推荐,我推荐勾选 -
注册Miniconda3作为默认的python3.12,如果本地已经有python环境,不用勾选,没有勾选上 -
安装完清理
安装以后,我们可以在命令行中执行Get-Command python
PS C:Usersyxkong> Get-Command python

CommandType     Name                                               Version    Source
-----------     ----                                               -------    ------
Application     python.exe                                         3.12.91... E:aiminiconda3python.exe
conda常用操作
conda配置操作
conda安装以后,我们先设置一下,设置显示通道地址
#设置显示通道地址
conda config --set show_channel_urls yes
#查看通道channels
conda config --show channels
channels:
  - https://repo.anaconda.com/pkgs/main
  - https://repo.anaconda.com/pkgs/r
-
设置完以后在对应的登录用户目录下,会有一个 .condarc文件,不管是unbuntu还是win10, -
还有一个 .condarc,在程序的安装目录中, -
通过命令操作修改的是当前用户目录中的 .condarc文件 -
在操作的时候,是把这两个文件进行了合并。
其他配置操作
#获取版本号
conda --version 或 conda -V

#检查更新当前conda
conda update conda

#禁止conda自动更新
conda config --set auto_update_conda False

#禁止自动激活base环境,需要每次手动激活
conda config --set auto_activate_base false
环境操作
常用操作
# 激活环境
conda activate ragflow

# 退出当前环境
conda deactivate

#查看环境列表
conda env list

#查看当前存在哪些虚拟环境
conda env list 或 conda info -e

#删除指定环境
conda env remove -n 环境名称
创建环境
#创建一个ragflow 的环境,包括 python 3.11  pip
conda create -n ragflow python=3.11 pip

# 从现有的环境复制一个到新的环境
conda create --clone old_env -n new_env

# 激活环境
conda activate ragflow
包管理
# 查看指定环境的包列表,
conda list package_name

# 查询当前包环境
conda list

#安装包,可以通过=设置版本号
conda install package_name
#比如
conda install numpy=1.18.5


conda install -c channel_name package_name


#根据requirements.txt安装环境
conda install --file requirements.txt

#从当前激活的 conda 环境中导出包列表到 requirements.txt 文件
conda list --export > requirements.txt

# 查询包
conda search package_name

#更新包
conda update package_name

# 删除包
conda remove package_name
镜像源设置
添加国内镜像
conda config --add channels https://mirrors.tuna.tsinghua.edu.cn/anaconda/pkgs/main/
conda config --add channels https://mirrors.tuna.tsinghua.edu.cn/anaconda/pkgs/free/
conda config --add channels https://mirrors.tuna.tsinghua.edu.cn/anaconda/cloud/conda-forge/
添加的这些链接是什么含义?接下来我们了解下。
镜像路径解释
清华大学的镜像站还是蛮全的,地址:https://mirrors.tuna.tsinghua.edu.cn/。 这里有很多好经常使用的软件。还有同步时间。
https://mirrors.tuna.tsinghua.edu.cn/anaconda/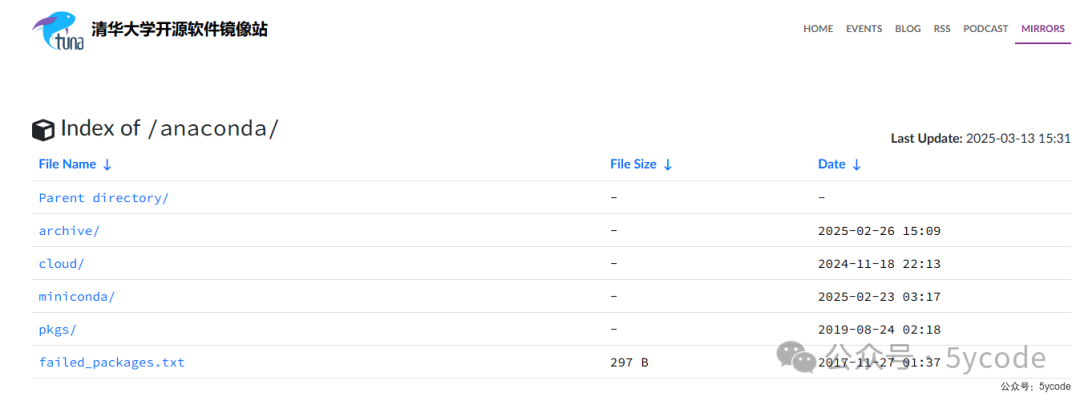
|
|
|
|---|---|
|
|
|
|
|
|
|
|
|
|
|
|
|
|
|

|
|
|
|---|---|
|
|
|
|
|
|
|
|
|
|
|
|
|
|
|
|
|
|
|
|
|
通过上面的说明,我们可以看到每个目录的含义,添加额每个url是什么含义,就有了清晰的了解了。
常用镜像站
清华
北外
https://mirrors.bfsu.edu.cn/anaconda
最后重定向到了清华
中科大
https://mirrors.ustc.edu.cn/anaconda/
conda config --add channels https://mirrors.ustc.edu.cn/anaconda/pkgs/main/
conda config --add channels https://mirrors.ustc.edu.cn/anaconda/pkgs/free/
conda config --add channels https://mirrors.ustc.edu.cn/anaconda/cloud/conda-forge/
conda config --add channels https://mirrors.ustc.edu.cn/anaconda/cloud/msys2/
conda config --add channels https://mirrors.ustc.edu.cn/anaconda/cloud/bioconda/
conda config --add channels https://mirrors.ustc.edu.cn/anaconda/cloud/menpo/
conda config --set show_channel_urls yes
我设置的
channels:
-https://mirrors.tuna.tsinghua.edu.cn/anaconda/pkgs/free/
-https://mirrors.tuna.tsinghua.edu.cn/anaconda/pkgs/main/
-https://mirrors.tuna.tsinghua.edu.cn/anaconda/cloud/pytorch/
-https://mirrors.tuna.tsinghua.edu.cn/anaconda/cloud/pytorch/win-64/
-https://mirrors.bfsu.edu.cn/anaconda/pkgs/free/
-https://mirrors.bfsu.edu.cn/anaconda/pkgs/main/
-https://mirrors.bfsu.edu.cn/anaconda/cloud/conda-forge/
-https://mirrors.ustc.edu.cn/anaconda/pkgs/free/
-https://mirrors.ustc.edu.cn/anaconda/pkgs/main/
-https://mirrors.ustc.edu.cn/anaconda/cloud/conda-forge/
-https://mirrors.ustc.edu.cn/anaconda/cloud/bioconda/
-https://mirrors.ustc.edu.cn/anaconda/cloud/msys2/
-https://mirrors.ustc.edu.cn/anaconda/cloud/menpo/
show_channel_urls:true
auto_update_conda:false
ragflow后端环境配置
#下载代码
git clone https://github.com/infiniflow/ragflow
我使用的是0.17.2版本的代码
设置PyCharm环境依赖
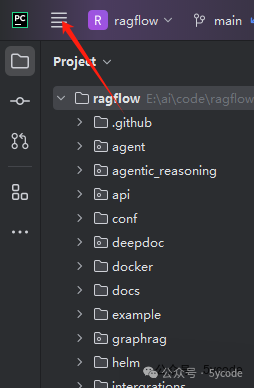
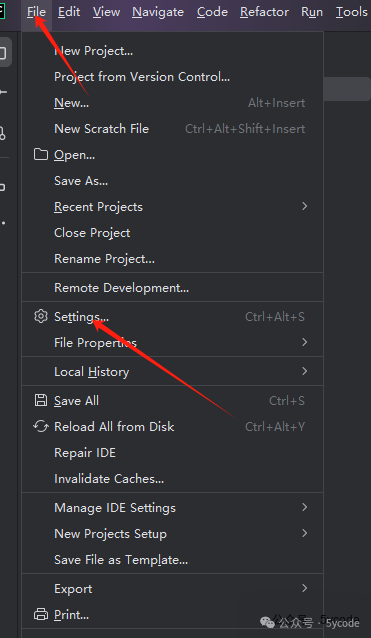
点击pycharm 的设置。

-
找到 python interpreter点击2的位置,然后点击3添加本地的python解释器。
python interpreter 中文叫python解释器,可以理解为python环境。
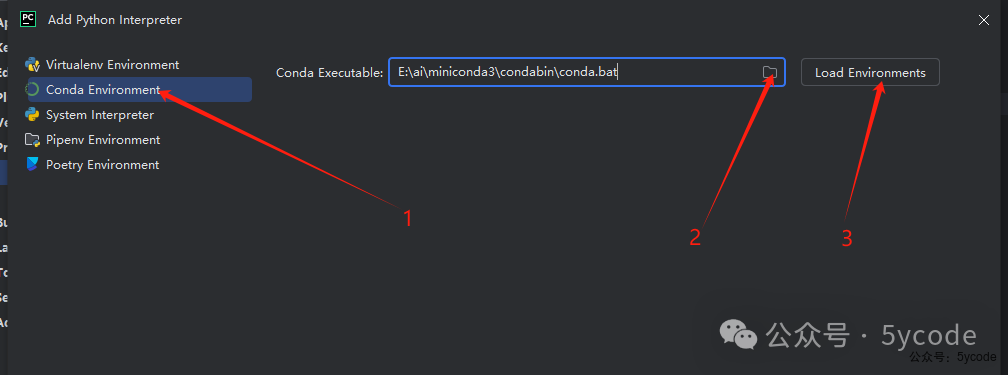
-
点击 1选择conda环境 -
点击 2选择自己安装的miniconda地址中的condabinconda.bat -
点击 3加载

-
点击 1使用已存在的环境(我之前创建的ragflow) -
选择 ragflow
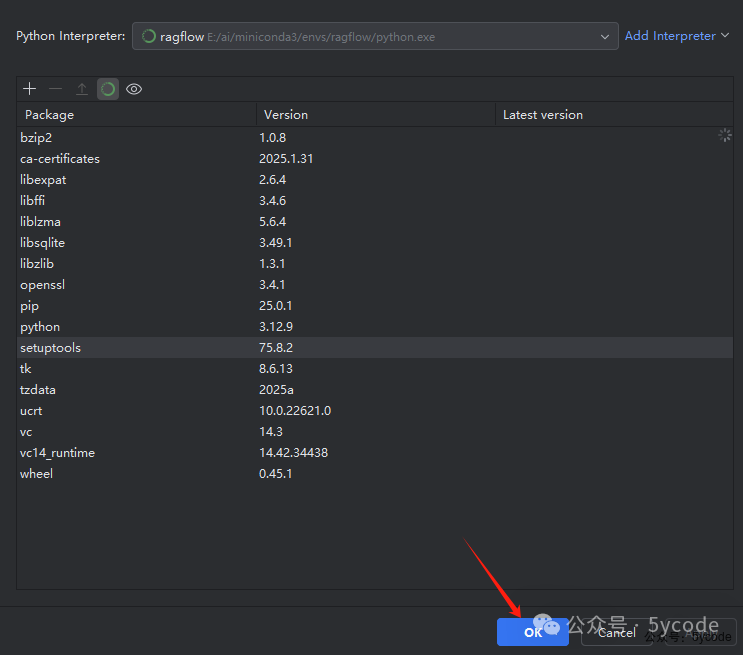
可以看到已经内置了一些包。我们点击ok按钮。
依赖安装
一般我们从别的地方拷贝一个项目安装依赖。有以下几种方式。
-
有 requirements.txt直接用项目里提供的requirements.txt 使用pip install -r requirements.txt安装 -
有 setup.py在setup.py所在目录里,使用pip install -e .安装 -
Poetry 项目有pyproject.toml文件,直接 poetry install -
Pipenv 项目 有Pipfile文件,使用 pipenv install安装
而ragflow都不是,ragflow使用uv管理包。在项目里有个uv.lock文件。
UV(UltraFast Python Package Installer) 是一个 超快速的 Python 包管理工具,用于替代 pip 和 virtualenv,它的核心特点是 安装速度快,依赖解析高效,并且支持 uv.lock 作为锁定文件。
然而我折腾了一会,安装不上。(事后总结还是用uv省事,基本上包都覆盖住了。)
使用conda
不想折腾太多环境,使用conda。
我找官方的开发,让他给我导了一份requirements.txt 文件一共275行。然后还是各种折腾了几个小时。启动时候各种缺包。
需要注意的是:
-
官网写着python 3.10,不行,得3.11,别问我为啥,折腾出来的
我把最后的requirements.txt 放入网盘,有需要的大家自己获取。一共433个。
https://pan.quark.cn/s/54ac26aa4bdb
配置文件
在根目录中有一个conf/service_conf.yaml文件这里是依赖的环境配置。 里面的服务我们都可以自己独立部署。我是之前在本地用docker部署了一套ragflow,所以我就不再单独处理了。
需要注意的事:
如果你docker启动的不是base,需要修改ragflow的端口。 如果你没有修改过docker部署的端口,可以直接使用,如果修改了,需要对应的修改。
后端服务启动
根据官方的文档,直接执行docker/entrypoint.sh既可以启动,我打开一看,是linux环境。
刚开始想把它转成win的脚步,后来试了下,还是算了,最后找到了以下两个命令。
$PY rag/svr/task_executor.py
$PY api/ragflow_server.py
直接在ragflow的根目录里,执行。
# 根据自己的环境设置
set PYTHONPATH=E:aicoderagflow

#启动异步任务的
python .ragsvrtask_executor.py

#启动后端api服务的
python api/ragflow_server.py
不容易,终于折腾好了
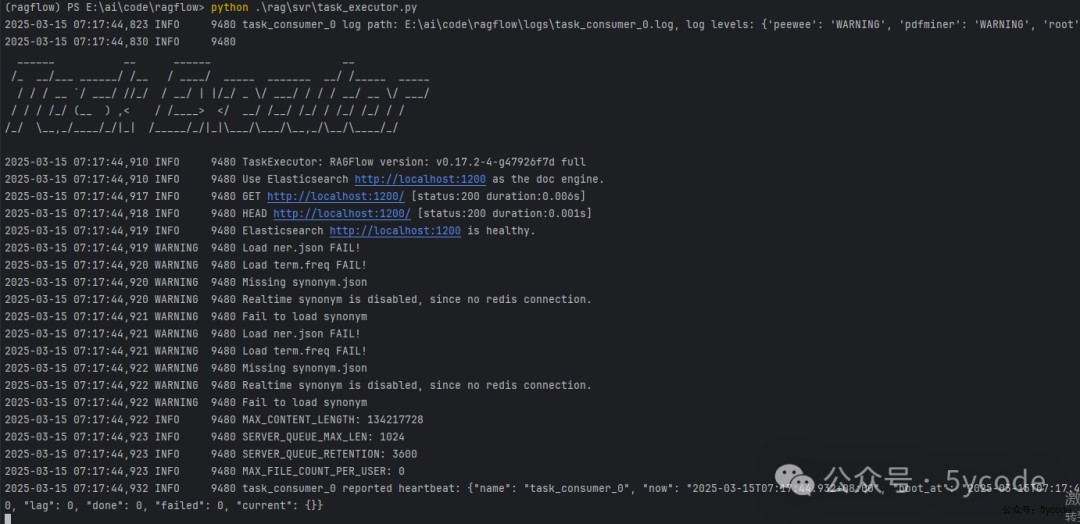 直接命令行启动。
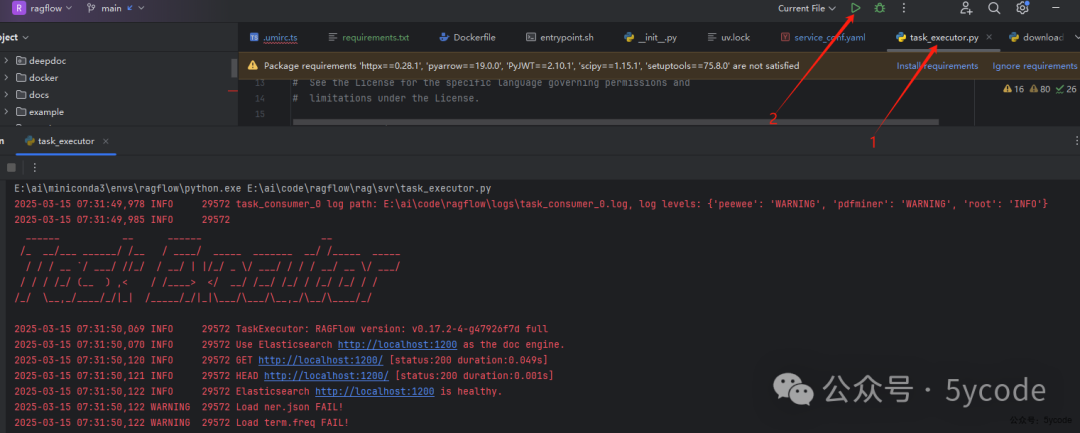 你也可以通过
PyCharm启动,特别是断点调试。
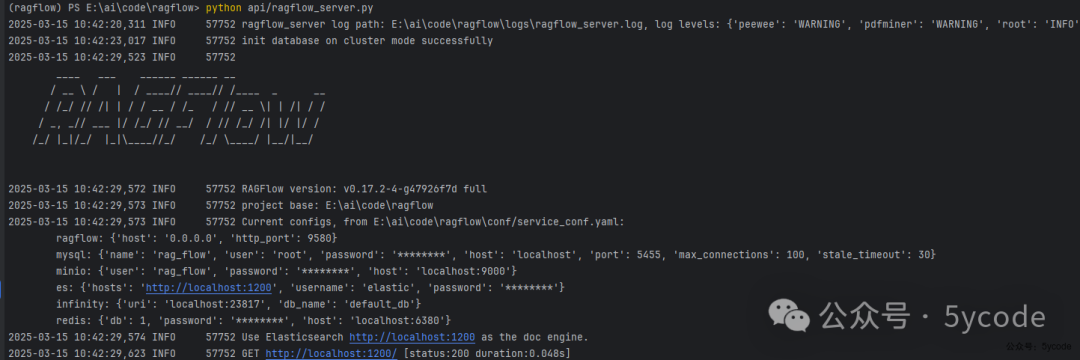 又是一堆依赖安装,server也启动了。
最后看下环境的大小。
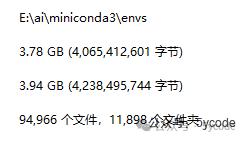 接近4个g了。
我打个包扔到盘里。大家根据自己的需要获取。 https://pan.quark.cn/s/54ac26aa4bdb
https://pan.baidu.com/s/1PF79x-gzWosN_ME5LtSRIw?pwd=q2tu
ragflow前端环境启动
前端服务启动
前端环境需要npm,或者pnpm,我之前一直有对应的环境,我就不折腾了。
首先进入web目录
# 进入ragflow的web目录
(ragflow) PS E:aicoderagflow> cd .web
首先修改.umirc.ts中的proxy。
比如我把后端的端口改成了9580
proxy: [
{
    context:['/api','/v1'],
    target:'http://127.0.0.1:9580/',
    changeOrigin:true,
    ws:true,
    logger:console,
    //pathRewrite:{'^/v1':'/v1'},
},
],
编译运行
# 安装前端依赖
(ragflow) PS E:aicoderagflowweb> npm install

# 启动项目
(ragflow) PS E:aicoderagflowweb> npm run dev

常用修改
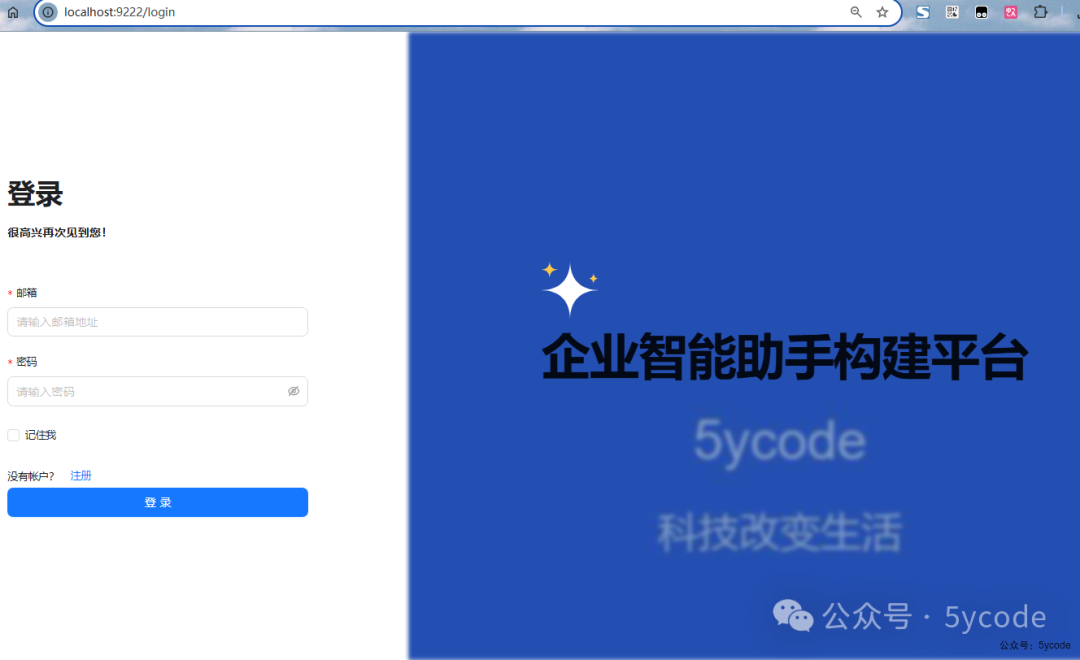
登录页面背景替换
-
替换背景:ragflow/web/src/assets/svg/login-background.svg -
去掉免费注册和图标:agflow/web/src/pages/login/right-panel.tsx 中 26~41删除 -
替换为客户的名称:agflow/web/src/locales/zh.ts 中57行的 title
logo修改
-
agflow/web/src/conf.json 中的RAGFlow 是图标边上的名称 -
agflow/web/public/logo.svg 左上角的logo

注意事项
关于依赖
如果大家自己折腾,建议用uv,直接导入官方提供的,缺有,但是不多。
不想用uv,使用conda,建议让kimi写个脚本,把uv.lock里的包都洗出来,洗成requirements.txt,然后启动的时候,添加几个就行了。
关于python版本
python必须3.11,3.10有些包安装不上,3.12有些包没有。
非固定版本的包安装
#通用安装法,加双引号
pip install "ruamel-yaml>=0.18.6,<=0.19.0"

# PowerShell 特有安装法,需要转义符号
pip install ruamel-yaml`>=0.18.6,`<=0.19.0
win10 中powershell失效的问题解决
在powershell中,通过pip安装以后,通过conda list查看安装的包,总是找不到。
执行conda init powershell命令,会看到会将conda加入到powershell的环境里。
PS C:Usersyxkong> conda init powershell
no change     E:aiminiconda3Scriptsconda.exe
no change     E:aiminiconda3Scriptsconda-env.exe
no change     E:aiminiconda3Scriptsconda-script.py
no change     E:aiminiconda3Scriptsconda-env-script.py
no change     E:aiminiconda3condabinconda.bat
no change     E:aiminiconda3Librarybinconda.bat
no change     E:aiminiconda3condabin_conda_activate.bat
no change     E:aiminiconda3condabinrename_tmp.bat
no change     E:aiminiconda3condabinconda_auto_activate.bat
no change     E:aiminiconda3condabinconda_hook.bat
no change     E:aiminiconda3Scriptsactivate.bat
no change     E:aiminiconda3condabinactivate.bat
no change     E:aiminiconda3condabindeactivate.bat
modified      E:aiminiconda3Scriptsactivate
modified      E:aiminiconda3Scriptsdeactivate
modified      E:aiminiconda3etcprofile.dconda.sh
modified      E:aiminiconda3etcfishconf.dconda.fish
no change     E:aiminiconda3shellcondabinConda.psm1
modified      E:aiminiconda3shellcondabinconda-hook.ps1
no change     E:aiminiconda3Libsite-packagesxontribconda.xsh
modified      E:aiminiconda3etcprofile.dconda.csh
modified      C:UsersyxkongDocumentsPowerShellprofile.ps1
modified      C:UsersyxkongDocumentsWindowsPowerShellprofile.ps1
No module named 'api'
我用PYTHONPATH把ragflow设为了根目录,但是执行的时候,还是找不到api的模块。
(ragflow) PS E:aicoderagflow> set PYTHONPATH=E:aicoderagflow
(ragflow) PS E:aicoderagflow> python .ragsvrtask_executor.py
Traceback (most recent call last):
  File "E:aicoderagflowragsvrtask_executor.py", line 22, in <module>
    from api.utils.log_utils import initRootLogger, get_project_base_directory
ModuleNotFoundError: No module named 'api'
不用环境的设置方法
# Windows
set PYTHONPATH=E:aicoderagflow

# Linux/macOS
export PYTHONPATH=/path/to/your/project/root

#需要注意的是,以上都是单个窗口的设置,可以全局设置


$env:PYTHONPATH="E:aicoderagflow"
Resource punkt_tab not found.
LookupError: Resource punkt_tab not found. Please use the NLTK Downloader to obtain the resource:
Resource wordnet not found 执行以下命令
 python -c "import nltk; nltk.download('punkt_tab')"
 python -c "import nltk; nltk.download('wordnet')"
关于数据库
我没在代码里看到初始化数据库的地方。
因为我本地用docker启了一套环境,所有的数据库都已经有了。如果你全部自己搭建,就把mysql的数据库导出一份。

