


随着 OpenClaw 爆火,OpenClaw 背后的`pi-mono`可能会在以后被更多地提起。
**`PI`是一个用于构建 AI Agent(智能体)的工具包。它是一个包含多个相互叠加的包的 monorepo(单体仓库):**
* •**pi-ai**处理跨提供商的 LLM 通信
* •**pi-agent-core**添加了带有工具调用功能的 Agent 循环
* •**pi-coding-agent**为你提供一个完整的编程 Agent,包含内置工具、会话持久化和可扩展性
* •**pi-tui**提供用于构建 CLI 界面的终端 UI
这些正是驱动 OpenClaw 的核心包。本指南将逐层介绍,逐步构建一个功能齐全、具有终端 UI、会话持久化和自定义工具的 Agent。
通过理解如何组合这些层,你可以按自己的方式构建生产级的 Agent 软件,而无需被锁定在特定的抽象中。
> Pi 由 @badlogicgames 创建,它是一个开源的项目,github地址是:https://github.com/badlogic/pi-mono
文章很长,目录如下,可以选择查看:
* • 技术栈
* • 第 1 层:pi-ai
* • 第 2 层:pi-agent-core
* • 第 3 层:pi-coding-agent
* • 构建实用的东西 – 一个代码库助手
* • OpenClaw 为生产环境的适配
* • 进阶指引
* * *
下面是正文。
## 技术栈
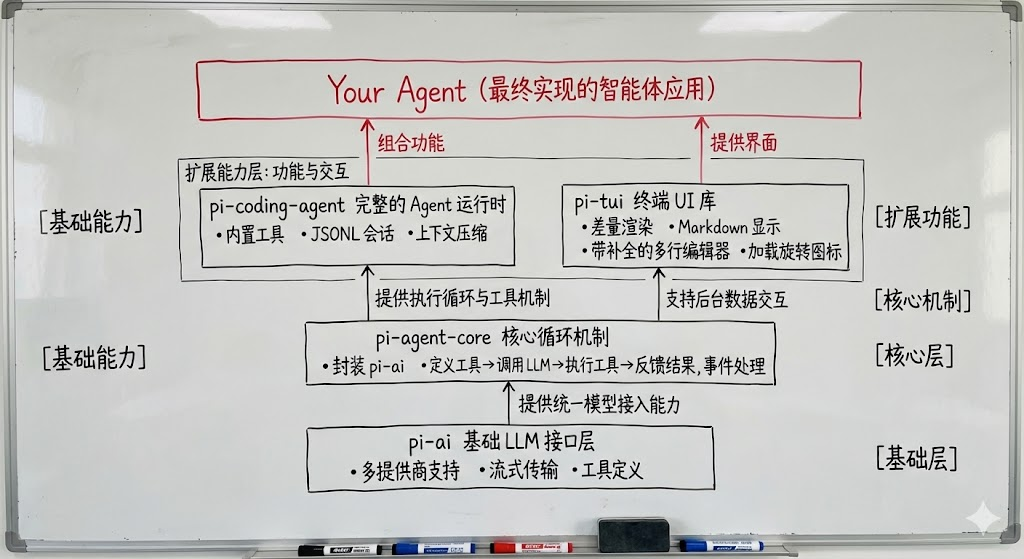
通过分层的架构,在每一层增加新的能力,而且做了很好地隔离。
**pi-ai**- 通过一个接口调用任何 LLM。支持 Anthropic, OpenAI, Google, Bedrock, Mistral, Groq, xAI, OpenRouter, Ollama,以及国内的 MiniMax、智谱等。支持流式传输、补全、工具定义和成本跟踪。
**pi-agent-core**- 将 pi-ai 封装进一个 Agent 循环中。你定义工具,Agent 调用 LLM,执行工具,将结果反馈回去,并重复此过程直到完成。
**pi-coding-agent**- 完整的 Agent 运行时。内置文件工具(读取、写入、编辑、bash)、JSONL 会话持久化、上下文压缩(compaction)、技能(skills)和扩展系统。
**pi-tui**- 带有差量渲染(differential rendering)的终端 UI 库。支持 Markdown 显示、带自动补全的多行编辑器、加载旋转图标以及无闪烁的屏幕更新。
**先决条件**
* • Node.js 20+
* • 至少一个提供商的 API 密钥,对于国内的朋友可以使用智谱的GLM-5或Minimax M2.5等模型
**示例代码以及说明**
本文的所有代码已经开源到 github 是,仓库地址是:`https://github.com/OmniTexts/pi-tutorial`。所有的代码是使用 Minimax M2.5 作为后端 LLM,只需要在 .env 中配置相关的`API Key`即可。
或直接在环境变量中设置你的 API 密钥:
`export MINIMAX_API_KEY=sk-api-…# orexport OPENAI_API_KEY=sk-…`
## 第 1 层:pi-ai
### 第一次 LLM 调用
创建`basics.ts`:
`import { getModel, completeSimple } from”@mariozechner/pi-ai”;asyncfunctionmain() {const model = getModel(“minimax”, “MiniMax-M2.5”);const response = awaitcompleteSimple(model, { systemPrompt: “You are a helpful assistant.”, messages: [ { role: “user”, content: “中国的首都在哪里?”, timestamp: Date.now() } ], });// response is an AssistantMessagefor (const block of response.content) { if (block.type === “text”) { console.log(block.text); } }console.log(`nTokens: ${response.usage.totalTokens}`);console.log(`Stop reason: ${response.stopReason}`);}main();`
运行它:
npx tsx basics.ts
`getModel`根据提供商和 ID 从 PI 内置的 2000 多个模型目录中查找模型。`completeSimple`发送消息并在模型完成时返回完整的`AssistantMessage`。
响应包含一个由类型化块(typed blocks)组成的`.content`数组——包括`text`(文本)、`thinking`(思考)或`toolCall`(工具调用)——以及用于计数的`.usage`和解释模型为何停止的`.stopReason`(如`”stop”`,`”toolUse”`,`”length”`,`”error”`,`”aborted”`)。
### 流式传输 (Streaming)
`completeSimple`会等待完整的响应。对于实时输出,请使用`streamSimple`:
`import { getModel, streamSimple } from”@mariozechner/pi-ai”;asyncfunctionmain() {const model = getModel(“minimax”, “MiniMax-M2.5”);const stream = streamSimple(model, { systemPrompt: “You are a helpful assistant.”, messages: [ { role: “user”, content: “用三句话解释 TCP/IP 的握手机制”, timestamp: Date.now() } ], });forawait (const event of stream) { switch (event.type) { case”text_delta”: process.stdout.write(event.delta); break; case”done”: console.log(`nnTokens: ${event.message.usage.totalTokens}`); break; case”error”: console.error(“Error:”, event.error.errorMessage); break; } }}main();`
每个提供商都有自己的流格式——Anthropic、OpenAI 和 Google 的做法各不相同。
`streamSimple`将它们标准化为一组统一的事件:`start`,`text_start`,`text_delta`,`text_end`,`thinking_start/delta/end`,`toolcall_start/delta/end`,`done`, 和`error`。
我们只需要编写一次流处理程序,它就可以与任何提供商一起工作。对于大多数用例,你只关心`text_delta`(文本块)和`done`(最终消息)。
我们也可以直接等待最终消息:
`const stream = streamSimple(model, context);const finalMessage = await stream.result(); // AssistantMessage`
### 切换提供商
通过更改`getModel`调用即可切换到不同的提供商。其余代码保持不变。
`// Just change this line – everything else stays the sameconst model = getModel(“anthropic”, “claude-opus-4-5”);// const model = getModel(“openai”, “gpt-4o”);// const model = getModel(“google”, “gemini-2.5-pro”);// const model = getModel(“groq”, “llama-3.3-70b-versatile”);const stream = streamSimple(model, context);`
每个提供商需要在环境中设置自己的 API 密钥(`ANTHROPIC_API_KEY`,`OPENAI_API_KEY`,`GEMINI_API_KEY`,`MINIMAX_API_KEY`等)。
你还可以为自托管端点定义自定义模型:
`import type { Model } from”@mariozechner/pi-ai”;constlocalModel: Model<"openai-completions"> = {id: “llama-3.1-8b”,name: “llama-3.1-8b”,api: “openai-completions”,provider: “ollama”,baseUrl: “http://localhost:11434/v1”,reasoning: false,input: [“text”],cost: { input: 0, output: 0, cacheRead: 0, cacheWrite: 0 },contextWindow: 128000,maxTokens: 8192,};`
在底层,pi-ai 使用官方提供商 SDK(OpenAI SDK, Anthropic SDK 等)。`api`字段决定哪个 SDK 处理请求——`”openai-completions”`通过 OpenAI SDK 路由,这就是为什么它可以与任何兼容 OpenAI 的端点(Ollama, vLLM, Mistral 等)一起工作。
API 密钥会根据提供商名称(`OPENAI_API_KEY`,`ANTHROPIC_API_KEY`等)从环境变量中自动解析并传递给 SDK,SDK 会处理身份验证。Ollama 不需要身份验证,所以上面的例子可以直接运行。对于需要密钥的提供商,可以设置匹配的环境变量或直接传递密钥:
`const stream = streamSimple(localModel, context, { apiKey: “your-api-key”,});`
### 思考层级 (Thinking levels)
`PI`支持扩展思考(extended thinking)的模型(如 Claude, o3, Gemini 2.5 等)可以通过`reasoning`选项启用。默认情况下是关闭的。
`const stream = streamSimple(model, context, { reasoning: “high”, // “minimal” | “low” | “medium” | “high” | “xhigh”});`
启用后,流会在发出`text_delta`的同时发出`thinking_delta`事件。
## 第 2 层:pi-agent-core
`pi-ai`让你能够与 LLM 对话。`pi-agent-core`让 LLM 能够通过工具进行回应。
`Agent`类运行标准的 Agent 循环:向 LLM 发送消息,执行它调用的任何工具,反馈结果,重复直到模型停止。
### 定义工具
工具使用 TypeBox[1]模式(schemas)进行类型安全的参数定义:
`import { Type } from”@mariozechner/pi-ai”;importtype { AgentTool } from”@mariozechner/pi-agent-core”;const weatherParams = Type.Object({city: Type.String({ description: “City name” }),});constweatherTool: AgentTool
将模式定义为独立变量,并将其作为泛型参数传递给`AgentTool
每个工具都有:
* •**name**- LLM 用来调用它的标识符
* •**label**- 人类可读的显示名称
* •**description**- 告诉 LLM 何时以及如何使用该工具
* •**parameters**- TypeBox 模式;在执行前使用 AJV 进行验证
* •**execute**- 当 LLM 调用工具时运行;返回`content`(发送回 LLM)和`details`(用于你的 UI,不发送给 LLM)
`onUpdate`回调允许你在执行期间流式传输部分结果——这对于运行时间较长的工具(如 bash 命令)非常有用。
### 创建 Agent
将上面的天气工具与模型和流式传输函数连接起来。我们将在接下来的部分中添加事件处理、提示词和完整的工作示例。
`import { Agent } from”@mariozechner/pi-agent-core”;import { getModel, streamSimple } from”@mariozechner/pi-ai”;const model = getModel(“minimax”, “MiniMax-M2.5”);const agent = newAgent({initialState: { systemPrompt: “You are a helpful assistant with access to tools.”, model, tools: [weatherTool], thinkingLevel: “off”, },streamFn: streamSimple,});`
`Agent`接受一个`initialState`(系统提示词、模型、工具、思考层级)和一个`streamFn`—— 实际调用 LLM 的函数。从 pi-ai 传入`streamSimple`会将 Agent 连接到模型指定的任何提供商。
### 事件流
订阅事件以查看 Agent 正在做什么:
`agent.subscribe((event) => {switch (event.type) { case”agent_start”: console.log(“Agent started”); break; case”message_update”: // Streaming text from the LLM if (event.assistantMessageEvent.type === “text_delta”) { process.stdout.write(event.assistantMessageEvent.delta); } break; case”tool_execution_start”: console.log(`nTool: ${event.toolName}(${JSON.stringify(event.args)})`); break; case”tool_execution_end”: console.log(`Result: ${event.isError ? “ERROR” : “OK”}`); break; case”agent_end”: console.log(“nAgent finished”); break; }});`
完整事件列表:
`agent_startagent_endturn_startturn_endmessage_startmessage_updatemessage_endtool_execution_starttool_execution_updatetool_execution_end`
### 运行 Agent
await agent.prompt(“What’s the weather in Tokyo and London?”);
就是这样。Agent 会:
1. 1. 将你的消息发送给 LLM
2. 2. LLM 决定为东京调用`get_weather`
3. 3. Agent 执行工具,反馈结果
4. 4. LLM 为伦敦调用`get_weather`
5. 5. Agent 再次执行,反馈结果
6. 6. LLM 生成最终的文本回复
你不需要编写循环。Agent 会处理它。
### 完整示例
这是一个包含两个工具(`list_files`、`read_file`)的完整工作 Agent:
`import { Agent } from”@mariozechner/pi-agent-core”;import { getModel, streamSimple } from”@mariozechner/pi-ai”;import { Type } from”@mariozechner/pi-ai”;importtype { AgentTool } from”@mariozechner/pi-agent-core”;import * as fs from”fs”;const readFileParams = Type.Object({path: Type.String({ description: “Path to the file” }),});constreadFileTool: AgentTool
### 引导 (Steering) 与跟进 (Follow-ups)
如果 Agent 正在运行,你想重定向它:
`// Interrupt: delivered after the current tool finishes.// Remaining pending tools are skipped.agent.steer({role: “user”,content: “Actually, skip that and read tsconfig.json instead.”,timestamp: Date.now(),});// Follow-up: queued for after the agent finishes naturally.// Doesn’t interrupt current work.agent.followUp({role: “user”,content: “Now summarize what you found.”,timestamp: Date.now(),});`
`steer`会中断 —— 它跳过剩余的工具并注入你的消息。`followUp`会等待 —— 它将消息排队,等待 Agent 自然停止后处理。OpenClaw 使用引导来处理实时用户消息(当 Agent 工作时有人打字),并使用跟进进行程序化链接。
### 状态管理
你可以随时更改 Agent 的配置:
`agent.setModel(getModel(“openai”, “gpt-4o”)); // Switch providers mid-sessionagent.setThinkingLevel(“high”); // Enable extended thinkingagent.setSystemPrompt(“New instructions.”); // Update the system promptagent.setTools([…newTools]); // Swap the tool setagent.replaceMessages(trimmedMessages); // Replace conversation history`
Agent 会在下一轮次应用这些更改。
## 第 3 层:pi-coding-agent
`pi-agent-core`提供了**循环**。`pi-coding-agent`则提供了一个生产就绪的 Agent,具备内置工具、会话持久化和可扩展性。它建立在`pi-agent-core`之上 —— 当你使用`pi-coding-agent 时`,你在底层已经使用了`pi-agent-core`。
大多数用户应该从这里开始,只有在需要不使用内置编程工具或会话系统的自定义 Agent 时,才直接使用 pi-agent-core。
### 内置工具
pi-coding-agent 有 7 个内置工具。默认情况下有 4 个处于激活状态 (`codingTools`),另外 3 个可用但默认关闭:
**默认工具(激活)**:
工具 作用
`read`读取文件内容和图片(jpg、png、gif、webp)。图片将作为附件返回。文本输出会被截断为 2000 行或 50KB。支持通过`offset/limit`分页读取大文件。
`bash`在工作目录执行 shell 命令。返回标准输出和标准错误,并会被截断为最后 2000 行或 50KB。提供可选的`timeout`(超时时间,单位为秒)。
`edit`替换文件中的精确文本。`oldText`必须完全匹配(包括空格)。用于精确的、外科手术般的修改。
`write`将内容写入文件。如果文件不存在则自动创建,如果已存在则覆盖。自动创建父级目录。
**附加工具(可选)**:
工具 作用
`grep`使用正则表达式或字面量模式在文件内容中搜索。返回匹配的行、文件路径和行号。遵循`.gitignore`规则。底层使用 ripgrep。
`find`使用 glob 模式查找文件。返回相对于搜索目录的匹配路径。遵循`.gitignore`规则。
`ls`列出目录内容。条目按字母顺序排列,目录带有`/`后缀。包含隐藏文件(dotfiles)。
这些工具被组织成预设:
`import { codingTools, readOnlyTools } from “@mariozechner/pi-coding-agent”;codingTools; // [read, bash, edit, write] – defaultreadOnlyTools; // [read, grep, find, ls] – exploration without modification`
或者选择单个工具:
`import { allBuiltInTools } from “@mariozechner/pi-coding-agent”;// allBuiltInTools.read, allBuiltInTools.bash, allBuiltInTools.edit,// allBuiltInTools.write, allBuiltInTools.grep, allBuiltInTools.find, allBuiltInTools.lsconst { session } = await createAgentSession({ model, tools: [allBuiltInTools.read, allBuiltInTools.bash, allBuiltInTools.grep], sessionManager: SessionManager.inMemory(),});`
### createAgentSession
`createAgentSession`将所有东西连接在一起 —— 模型、工具、会话持久化、设置:
`import { createAgentSession, SessionManager } from”@mariozechner/pi-coding-agent”;import { getModel, streamSimple } from”@mariozechner/pi-ai”;asyncfunctionmain() {const model = getModel(“minimax”, “MiniMax-M2.5”);const { session } = awaitcreateAgentSession({ model, thinkingLevel: “off”, sessionManager: SessionManager.inMemory(), }); session.agent.streamFn = streamSimple; session.subscribe((event) => { if (event.type === “message_update” && event.assistantMessageEvent.type === “text_delta”) { process.stdout.write(event.assistantMessageEvent.delta); } if (event.type === “tool_execution_start”) { console.log(`n[${event.toolName}]`); } });await session.prompt(“What files are in the current directory? Summarize the package.json.”);console.log(); session.dispose();}main();`
这是一个可工作的编程 Agent。它可以读取你的文件,运行命令,编辑代码,以及写入新文件。`SessionManager.inMemory()`意味着会话存在于内存中,并在进程退出时消失。
### 会话持久化
为了持久化会话,请将 SessionManager 指向一个文件:
`import * as path from “path”;const sessionFile = path.join(process.cwd(), “.sessions”, “my-session.jsonl”);const sessionManager = SessionManager.open(sessionFile);const { session } = await createAgentSession({ model, sessionManager,});`
会话存储为 JSONL[2]文件,具有树状结构 —— 每个条目都有一个`id`和`parentId`。这使得分支成为可能:你可以导航到对话中的任何先前点并从那里继续,而不会丢失历史记录。
`SessionManager`有几个静态工厂方法。根据你的用例选择一个并将其传递给`createAgentSession`:
`// Option 1: In-memory (ephemeral, nothing written to disk)const sessionManager = SessionManager.inMemory();// Option 2: New persistent session in ~/.pi/agent/sessions/const sessionManager = SessionManager.create(process.cwd());// Option 3: Open a specific session fileconst sessionManager = SessionManager.open(“/path/to/session.jsonl”);// Option 4: Continue the most recent session (or create new if none exists)const sessionManager = SessionManager.continueRecent(process.cwd());// Then pass whichever one you chose:const { session } = await createAgentSession({ model, sessionManager });`
你还可以列出目录中的现有会话:
const sessions = await SessionManager.list(process.cwd());
一旦你有了`SessionManager`,你很少需要直接调用它的方法 ——`createAgentSession`会处理大部分连接工作。但是,如果你正在构建自定义会话逻辑(就像`OpenClaw`为多通道路由所做的那样),这些是关键方法:
`// Reconstruct the conversation from the JSONL file.// Use this when you need to inspect or display the current conversation// outside of the agent session (e.g., showing history in a web UI).const { messages, thinkingLevel, model } = sessionManager.buildSessionContext();// Get the last entry in the current branch.// Useful for checking what the most recent message was,// or grabbing an entry ID to branch from.const leaf = sessionManager.getLeafEntry();// Fork the conversation from a specific point.// Everything after entryId is abandoned (but still in the file).// The agent continues from that point on the next prompt.// OpenClaw uses this for “retry from here” flows.sessionManager.branch(entryId);// Manually append a message to the session transcript.// createAgentSession does this automatically during prompt(),// but you’d use it to inject messages programmatically -// e.g., adding a system notification or a cron-triggered prompt.sessionManager.appendMessage(message);// Get the full tree structure of the session.// Each node has children, so you can render a branch selector// or let users navigate conversation history.const tree = sessionManager.getTree();`
OpenClaw 每个频道线程使用一个会话文件:
`~/.openclaw/agents/
因此每个对话都是独立的且防崩溃的(JSONL 是只追加的;崩溃时你最多丢失一行)。
### 使用工具工厂
像`codingTools`和`readOnlyTools`这样的预构建工具数组是单例,它们在进程运行的任何目录上操作。如果你需要操作特定目录的工具,请使用工厂函数:
`import { createCodingTools, createReadOnlyTools, createReadTool, createBashTool, createGrepTool,} from”@mariozechner/pi-coding-agent”;// Create preset groups scoped to a workspaceconst customCodingTools = createCodingTools(“/path/to/workspace”); // [read, bash, edit, write]const customReadOnlyTools = createReadOnlyTools(“/path/to/workspace”); // [read, grep, find, ls]// Or create individual tools – there’s a factory for each built-in toolconst customRead = createReadTool(“/path/to/workspace”);const customBash = createBashTool(“/path/to/workspace”);const customGrep = createGrepTool(“/path/to/workspace”);`
每个工厂都接受一个可选的`operations`对象来覆盖底层 I/O —— 如果你想在 Docker 容器内、通过 SSH 或针对虚拟文件系统运行工具,这非常有用:
`// Read files from a remote server instead of the local diskconst remoteRead = createReadTool(“/workspace”, { operations: { readFile: async (path) => fetchFileFromRemote(path), access: async (path) => checkRemoteFileExists(path), },});// Execute commands in a Docker sandbox instead of the hostconst sandboxedBash = createBashTool(“/workspace”, { operations: { exec: async (command, cwd, opts) => runInDockerContainer(command, cwd, opts), },});`
OpenClaw 使用这些工厂为每个 Agent 创建作用域在工作区内的工具,然后用额外的中间件包装它们 —— 权限检查、读取工具的图像规范化,以及 Claude Code 参数兼容性别名(`file_path`→`path`,`old_string`→`oldText`)。
### 自定义工具与内置工具并存
**内置工具涵盖了文件操作和 shell 命令**。
对于其他任何事情 —— 部署、调用 API、查询数据库 —— 定义你自己的工具并通过`customTools`传递。它们将与默认工具一起使用:
`import { Type } from”@mariozechner/pi-ai”;importtype { AgentTool } from”@mariozechner/pi-agent-core”;const deployParams = Type.Object({environment: Type.String({ description: “Target environment”, default: “staging” }),});constdeployTool: AgentTool
现在 Agent 拥有 read, write, edit, bash**以及**deploy。
### 压缩 (Compaction)
长对话会超出模型的上下文窗口。`pi-coding-agent`通过压缩来处理这个问题 ——在保留最近消息的同时总结旧消息:
`import { estimateTokens } from “@mariozechner/pi-coding-agent”;// Check how many tokens the conversation usesconst totalTokens = session.messages.reduce( (sum, msg) => sum + estimateTokens(msg), 0);// Manually trigger compaction – the optional string guides what the summary should preserveif (totalTokens > 100_000) { await session.compact(“Preserve all file paths and code changes.”);}`
默认情况下,`createAgentSession`启用了自动压缩 —— 当上下文接近模型窗口限制时自动触发。完整的消息历史记录保留在 JSONL 文件中;只有内存中的上下文会被压缩。
### 扩展 (Extensions)
**工具让 LLM 做事。扩展让你修改 Agent 的行为方式—— 而无需让 LLM 知道**。
它们挂钩到 Agent 循环期间触发的生命周期事件:在消息发送到 LLM 之前、压缩运行之前、工具被调用时、会话开始时。LLM 永远看不到其上下文中的扩展;它们在幕后运作。
这里你可以放置如下逻辑:修剪旧的工具结果以保持上下文窗口聚焦、用自定义总结管道替换默认压缩、基于权限控制工具调用,或根据对话的当前状态注入额外的上下文。
扩展是一个 TypeScript 模块,它导出一个接收`ExtensionAPI`的函数:
`import type { ExtensionAPI } from”@mariozechner/pi-coding-agent”;exportdefaultfunctionmyExtension(api: ExtensionAPI): void {// Fires before every LLM call. Lets you rewrite the message array. api.on(“context”, (event, ctx) => { const pruned = event.messages.filter((msg) => { // Drop large tool results older than 10 messages if (msg.role === “toolResult” && event.messages.indexOf(msg) < event.messages.length - 10) { const text = msg.content.map((c) => (c.type === “text” ? c.text : “”)).join(“”); if (text.length > 5000) returnfalse; } returntrue; }); return { messages: pruned }; });// Replace the default compaction with your own summarization logic api.on(“session_before_compact”, async (event, ctx) => { const summary = awaitmyCustomSummarize(event.messages); return { compaction: { summary, firstKeptEntryId: event.firstKeptEntryId, tokensBefore: event.tokensBefore } }; });// Register a user-facing command (not an LLM tool) api.registerCommand(“stats”, { description: “Show session statistics”, handler: async (_args, ctx) => { const stats = ctx.session.getSessionStats(); console.log(`Messages: ${stats.totalMessages}, Cost: $${stats.cost.toFixed(4)}`); }, });}`
关键的扩展事件包括`context`(在 LLM 看到之前重写消息)、`session_before_compact`(自定义总结)、`tool_call`(拦截或控制工具调用)、`before_agent_start`(注入上下文或修改提示词),以及`session_start`/`session_switch`(响应会话更改)。
OpenClaw 使用扩展来进行上下文修剪(静默修剪过大的工具结果以节省 token)和压缩保护(用一个保留文件操作历史和工具失败数据的多阶段管道替换 pi 的默认总结)。
## 构建实用的东西
这是一个将所有三层结合在一起的完整示例:一个代码库助手,它可以读取你的项目、回答问题、进行更改,并跨重启记住对话。
创建`assistant.ts`:
`import { createAgentSession,SessionManager, estimateTokens,} from”@mariozechner/pi-coding-agent”;import { getModel, streamSimple } from”@mariozechner/pi-ai”;import { Type } from”@mariozechner/pi-ai”;importtype { AgentTool } from”@mariozechner/pi-agent-core”;import * as path from”path”;import * as fs from”fs”;import * as readline from”readline”;// — Custom tool: search the web —const webSearchParams = Type.Object({query: Type.String({ description: “Search query” }),});constwebSearchTool: AgentTool
运行它:
npx tsx assistant.ts
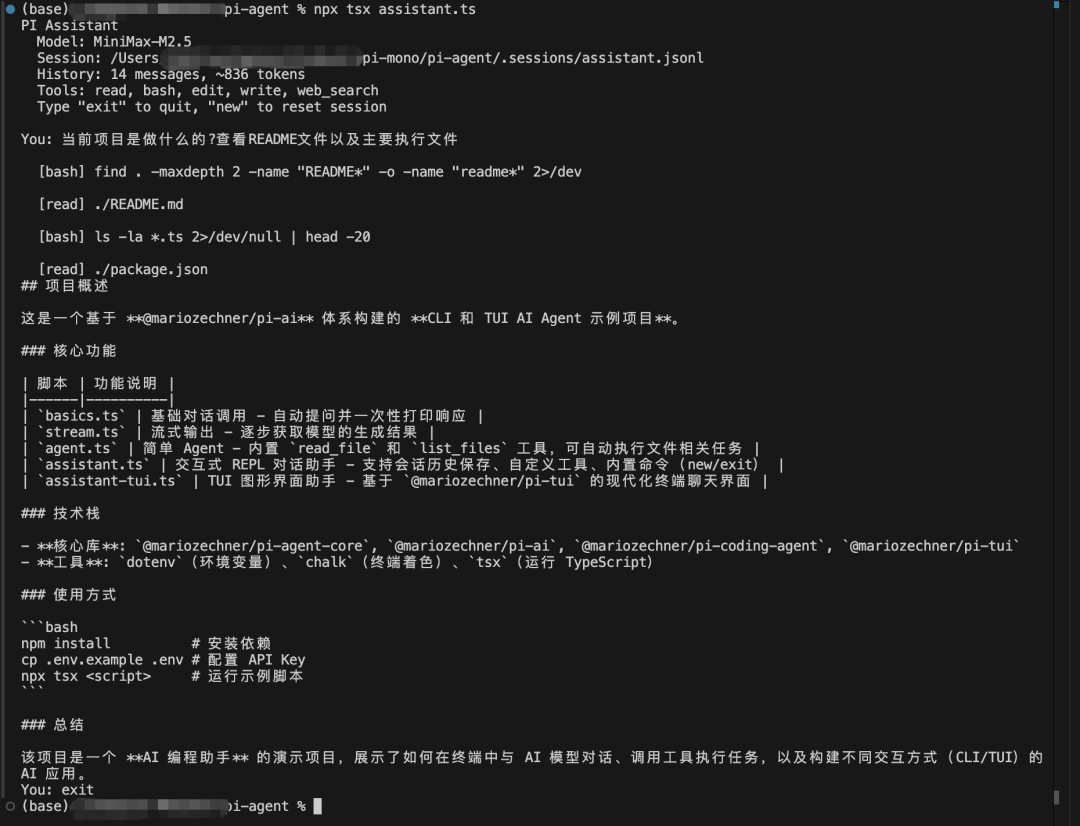
上面提供了一个约 120 行代码的持久化编程助手。它可以读取文件、运行命令、编辑代码、搜索网络,并且跨重启记住你的对话。JSONL 文件中的会话树即使经过压缩也能保留完整的历史记录。
一个会话看起来像这样:
## OpenClaw 为生产环境的适配
OpenClaw 采用了这种相同的模式,并为生产用途添加了更多层级:
### 多提供商认证
OpenClaw 不使用单一的`ANTHROPIC_API_KEY`或`MINIMAX_API_KEY`,而是使用`AuthStorage`和`ModelRegistry`来管理跨提供商的凭证并支持 OAuth 流程:
`import { AuthStorage, ModelRegistry } from “@mariozechner/pi-coding-agent”;const authStorage = AuthStorage.create(path.join(agentDir, “auth.json”));const modelRegistry = new ModelRegistry(authStorage, modelsConfigPath);const { session } = await createAgentSession({ authStorage, modelRegistry, model: modelRegistry.find(“ollama”, “llama3.1:8b”), // …});`
`AuthStorage`从`auth.json`文件中读取 —— 这是一个以提供商名称为键的扁平对象,每个值要么是 API 密钥,要么是 OAuth 凭证:
`{ “anthropic”:{“type”:”api_key”,”key”:”sk-ant-…”},”openai”:{“type”:”api_key”,”key”:”sk-…”},”minimax”:{“type”:”api_key”,”key”:”sk-api-…”},”devin”:{“type”:”api_key”,”key”:”cog_…”},”github-copilot”:{ “type”:”oauth”, “refresh”:”gho_xxxxxxxxxxxx”, “access”:”ghu_yyyyyyyyyyyy”, “expires”:1700000000000}}`
`key`字段可以是字面值、环境变量名称,或以前缀`!`开头的 shell 命令(例如,`”!op read ‘op://vault/openai/key'”`用于 1Password)。OAuth 令牌会在过期时自动刷新。
`ModelRegistry`读取`models.json`文件,其中定义了自定义提供商和模型。这就是添加自托管模型或 pi 未内置的提供商的方式:
`{ “providers”:{ “ollama”:{ “baseUrl”:”http://localhost:11434/v1″, “api”:”openai-completions”, “apiKey”:”ollama”, “models”:[ {“id”:”llama3.1:8b”}, {“id”:”qwen2.5-coder:7b”} ] }, “my-company-api”:{ “baseUrl”:”https://llm.internal.company.com/v1″, “api”:”openai-completions”, “apiKey”:”COMPANY_LLM_KEY”, “authHeader”:true, “models”:[ {“id”:”internal-model-v2″} ] }}}`
这里定义的模型会显示在内置目录旁边。`modelRegistry.find(“ollama”, “llama3.1:8b”)`返回一个完全类型化的`Model`,你可以将其传递给`createAgentSession`。
### 流中间件 (Stream middleware)
`session.agent.streamFn`是 Agent 在需要与 LLM 对话时调用的函数。默认情况下它是`streamSimple`,但你可以包装它以注入标头、调整参数或基于每个提供商添加日志记录。
OpenClaw 使用它来添加 OpenRouter 归属标头并启用 Anthropic 提示缓存:
`import { streamSimple } from”@mariozechner/pi-ai”;importtype { StreamFn } from”@mariozechner/pi-agent-core”;constwrappedStreamFn: StreamFn = (model, context, options) => {constextraHeaders: Record
### 工具定制
默认的内置工具在`process.cwd()`上操作,这对于本地 CLI 来说很好。
但在像 OpenClaw 这样的多用户产品中,每个 Agent 会话需要锁定到特定的工作区目录,以便用户无法读取或写入其项目之外的内容。OpenClaw 使用工具工厂通过工作区根目录重建文件工具,保持相同的工具行为但限制所有路径的作用域:
`import { codingTools, readTool, createReadTool, createWriteTool, createEditTool,} from”@mariozechner/pi-coding-agent”;importtype { AgentTool } from”@mariozechner/pi-agent-core”;functionbuildTools(workspace: string): AgentTool[] {return (codingTools asAgentTool[]).map((tool) => { if (tool.name === readTool.name) { returncreateReadTool(workspace); } if (tool.name === “write”) { returncreateWriteTool(workspace); } if (tool.name === “edit”) { returncreateEditTool(workspace); } return tool; // bash stays as-is });}`
### 事件路由
当 Agent 运行时,它会发出事件 —— 文本 token 流入、工具调用开始和结束、Agent 完成其轮次。在终端应用程序中,你只需将这些打印到 stdout。
但 OpenClaw 代表通过 Telegram, Discord 或 Slack 聊天的用户运行 Agent,因此它需要将这些事件转换为特定平台的消息。`session.subscribe()`为每个事件提供回调,你可以决定如何处理每个事件:
`session.subscribe((event) => {switch (event.type) { case”message_update”: if (event.assistantMessageEvent.type === “text_delta”) { // Tokens arrive one at a time – buffer them, then send as one message messageBuffer.append(event.assistantMessageEvent.delta); } break; case”tool_execution_start”: // Send tool call notification to the channel channel.sendNotification(`Running ${event.toolName}…`); break; case”agent_end”: // Flush remaining buffered text messageBuffer.flush(); break; }});`
#### 添加终端 UI (TUI)
`assistant.ts`示例使用`readline`进行输入 —— 它可以工作,但没有 Markdown 渲染,没有自动补全,并且使用原始的`process.stdout.write`进行流式传输。`pi-tui`用适当的终端 UI 替换了所有这些:具有语法高亮的 Markdown、带有斜杠命令和文件路径自动补全的编辑器、加载旋转图标以及无闪烁的差量渲染。
这是升级到 pi-tui 的同一个助手。创建`assistant-tui.ts`:
`import { createAgentSession,SessionManager, estimateTokens,} from”@mariozechner/pi-coding-agent”;import { getModel, streamSimple } from”@mariozechner/pi-ai”;import { Type } from”@mariozechner/pi-ai”;importtype { AgentTool } from”@mariozechner/pi-agent-core”;import {TUI,ProcessTerminal,Editor,Markdown,Text,Loader,CombinedAutocompleteProvider,} from”@mariozechner/pi-tui”;importtype { EditorTheme, MarkdownTheme } from”@mariozechner/pi-tui”;import chalk from”chalk”;import * as path from”path”;import * as fs from”fs”;// — Themes —constmarkdownTheme: MarkdownTheme = {heading: (s) => chalk.bold.cyan(s),link: (s) => chalk.blue(s),linkUrl: (s) => chalk.dim(s),code: (s) => chalk.yellow(s),codeBlock: (s) => chalk.green(s),codeBlockBorder: (s) => chalk.dim(s),quote: (s) => chalk.italic(s),quoteBorder: (s) => chalk.dim(s),hr: (s) => chalk.dim(s),listBullet: (s) => chalk.cyan(s),bold: (s) => chalk.bold(s),italic: (s) => chalk.italic(s),strikethrough: (s) => chalk.strikethrough(s),underline: (s) => chalk.underline(s),};consteditorTheme: EditorTheme = {borderColor: (s) => chalk.dim(s),selectList: { selectedPrefix: (s) => chalk.blue(s), selectedText: (s) => chalk.bold(s), description: (s) => chalk.dim(s), scrollInfo: (s) => chalk.dim(s), noMatch: (s) => chalk.dim(s), },};// — Custom tool —const webSearchParams = Type.Object({query: Type.String({ description: “Search query” }),});constwebSearchTool: AgentTool
运行它:
npx tsx assistant-tui.ts
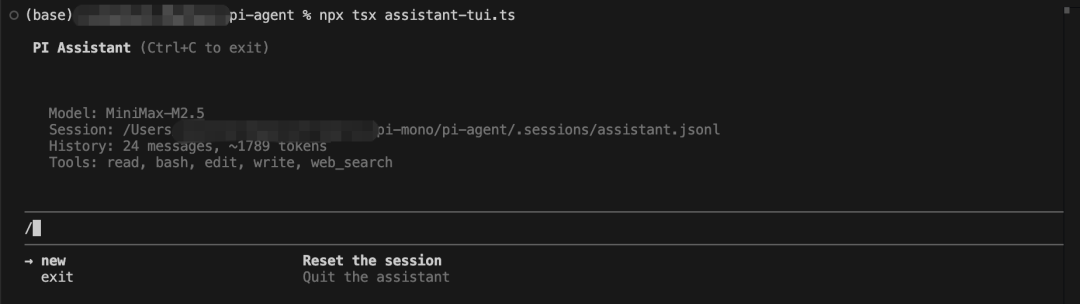
与`readline`版本的主要区别:
* •**Markdown 渲染**。Agent 的响应以语法高亮的代码块、粗体、斜体、列表和链接进行渲染 —— 而不是转储到 stdout 的原始文本。
* •**通过`setText`进行流式传输**。随着 token 到达,我们追加到字符串并调用`streamingMarkdown.setText()`。TUI 的差量渲染器仅更新更改的行 —— 无闪烁,无清屏。
* •**带自动补全的编辑器**。输入`/`即可获得斜杠命令下拉列表。按`Tab`键进行文件路径补全。使用`Shift+Enter`进行多行输入。
* •**加载旋转图标**。`Loader`组件在 Agent 思考时显示动画旋转图标,然后在文本开始流式传输时自行移除。
* •**无需手动光标管理**。TUI 处理终端状态、光标定位和清理。没有分散在事件处理程序中的`process.stdout.write`调用。
架构是一样的 ——`createAgentSession`+`session.subscribe()`+`session.prompt()`。唯一的变化是 如何 渲染事件:你不是写入 stdout,而是在 TUI 的组件树中添加和更新`Markdown`,`Text`, 和`Loader`组件。
## 进阶指引
本指南涵盖了构建基于终端的 Agent 所需的四个包。
其余的 pi-mono 包将系统向其他方向扩展:
* •**pi-web-ui**- 用于基于浏览器的聊天界面的 Lit Web 组件。提供支持流式传输、文件附件和产物渲染(沙盒 iframe 中的 HTML/SVG/Markdown)的即用型`ChatPanel`组件。
* •**pi-mom**- 一个将消息委托给 pi-coding-agent 的 Slack 机器人。支持每个频道的 Agent 隔离、Docker 沙盒、预定事件和自管理工具安装。
* •**pi-pods**- 用于通过 vLLM 在 GPU pod 上部署开源模型的 CLI。支持 DataCrunch, RunPod, Vast.ai, 和裸机。每个部署的模型都公开一个 pi-ai 可以使用的 OpenAI 兼容端点。
pi-coding-agent[3]文档涵盖了完整的扩展 API、技能系统和 CLI 用法。pi-mono 的 AGENTS.md[4]包含了添加新 LLM 提供商的详细说明。
希望通过这样的框架,结合领域的专业知识,可以创建你自己的**龙虾**
