

本文分享基于Spring AI+DeepSeek R1搭建企业私有化模型工具的案例,效果截图:
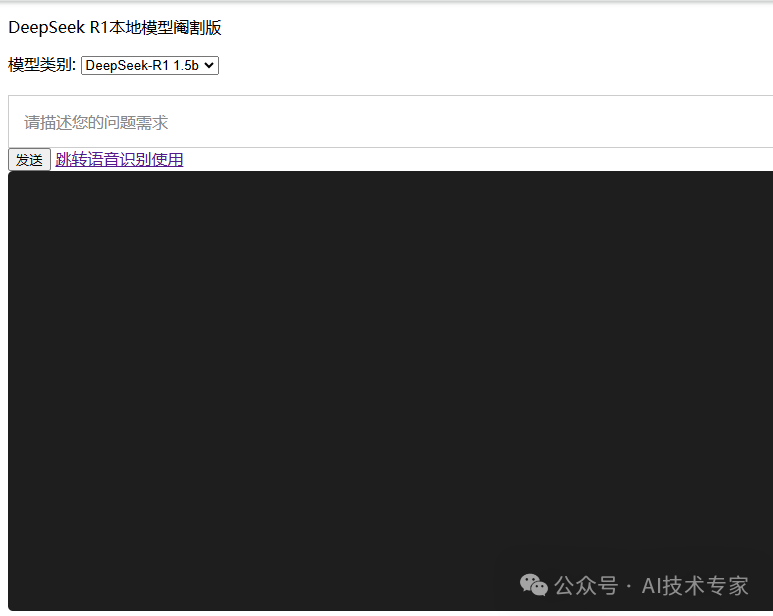
可自由切换部署的本地模型,选择deepseek-r1 1.5b参数模型:
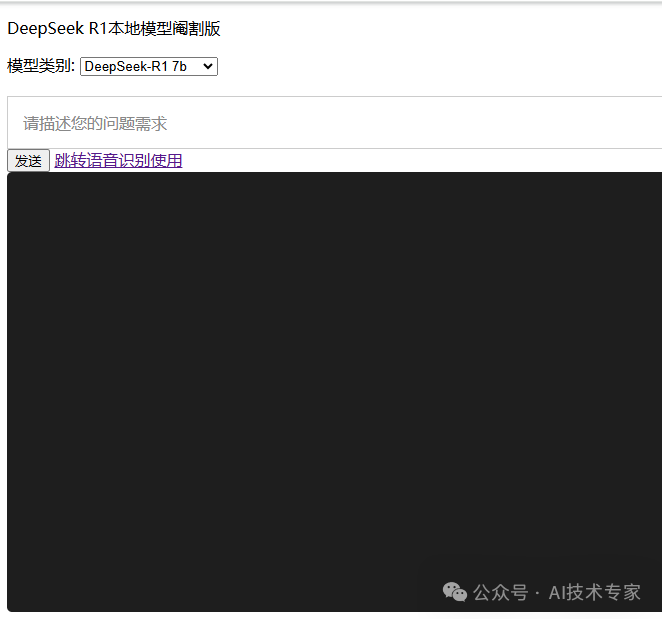
选择deepseek-r1 7b参数模型:
涉及到的技术有OLLAMA、DeepSeek R1与Spring AI,OLLAMA部署在Linux操作系统,Spring AI项目本地可以直接跑,也可以部署在服务器上。

01
在Linux系统下,官方推荐的安装OLLAMA命令:
curl -fsSL https://ollama.org.cn/install.sh | sh

实测后发现网速非常慢,推荐使用第二种:
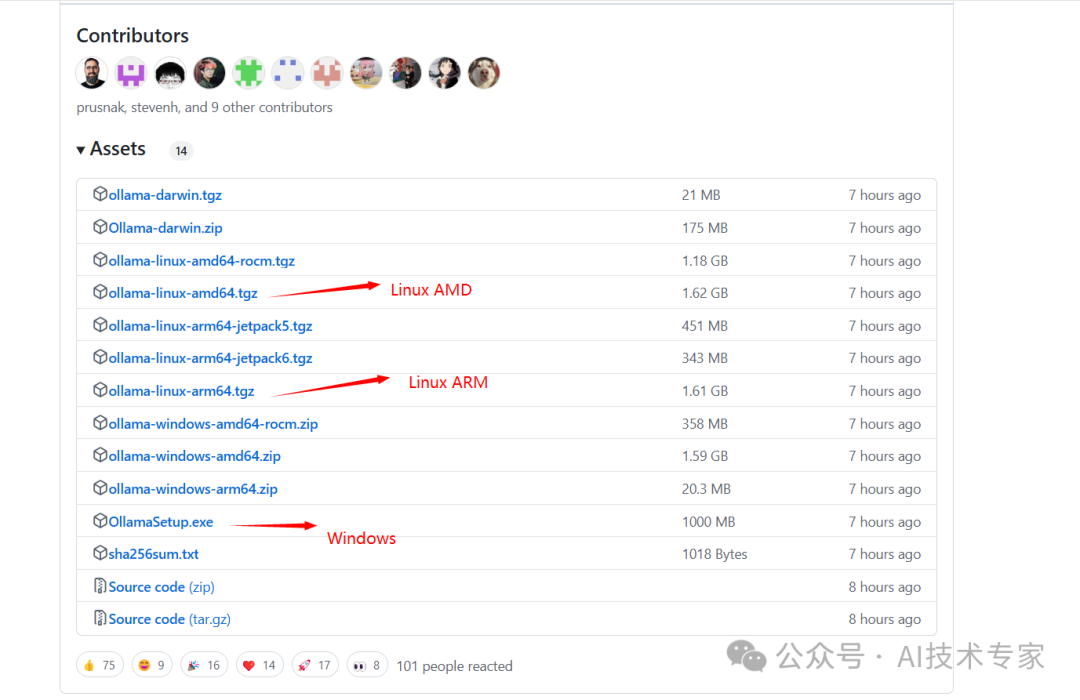
https://github.com/ollama/ollama/releases
选择Assets,下载Windows及对应Linux平台的ollama:
为方便大家使用,我已准备好下载文件:通过网盘分享的文件:
链接: https://pan.baidu.com/s/1MkLCX1K89fWx1UPf4IKbbw?pwd=mbh3
提取码: mbh3
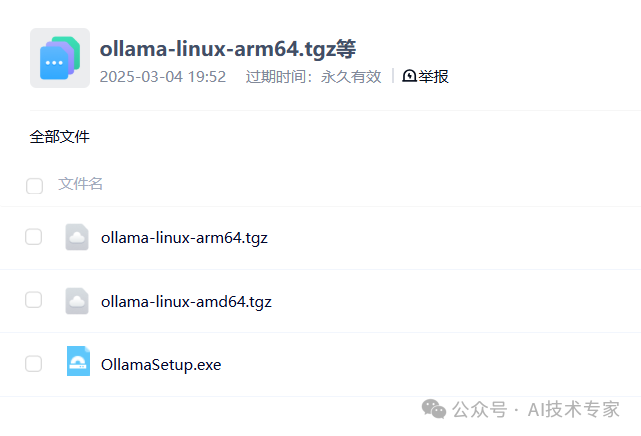
本人Linux操作系统适用ollama-linux-amd64.tgz
将ollama-linux-amd64.tgz文件上传到Linux操作系统/u01/ollama目录下,如果没有此目录,可创建:mkdir -p /u01/ollama
然后进入目录:cd /u01/ollama
安装ollama:
sudo tar -C /usr -xzf ollama-linux-amd64.tgz
安装之后ollama命令出现在在:/usr/bin/ollama文件下
运行ollama:
ollama serve
保持运行状态,另外再打开一个Linux终端查看ollama状态:

表示已运行成功。
接下来需要将ollama加入后台运行,开机启动:
(1)为 Ollama 创建用户和组:
sudo useradd -r -s /bin/false -U -m -d /usr/share/ollama ollama
sudo usermod -a -G ollama $(whoami)
(2)创建OLLAMA服务文件:
sudo vim /etc/systemd/system/ollama.service
文件内容:
[Unit]
Description=Ollama Service
After=network-online.target
[Service]
ExecStart=/usr/bin/ollama serve
User=ollama
Group=ollama
Restart=always
RestartSec=3
Environment="OLLAMA_HOST=0.0.0.0:11434"
[Install]
WantedBy=default.target
其中Environment="OLLAMA_HOST=0.0.0.0:11434"表示指定OLLAMA可以运行的ip为任意ip,默认为127.0.0.1
保存并退出编辑/etc/systemd/system/ollama.service后
给文件授可执行权限:
sudo chmod 777 /etc/systemd/system/ollama.service
(3)后台启动服务ollama
sudo systemctl daemon-reload
设置开机自启:
sudo systemctl enable ollama
启动ollama:
sudo systemctl start ollama
sudo systemctl enable ollama
如果后期修改了/etc/systemd/system/ollama.service配置,需要重新执行以下命令生效:
首先:sudo systemctl daemon-reload
然后:sudo systemctl restart ollama
最后:sudo systemctl enable ollama

02
第二步,需要借助ollama安装deepseek r1模型。
已知满血版的DeepSeek R1参数是671B。
需要根据您的Linux服务器性能决定安装哪个模型,参数越多的模型,需要的显卡配置要求和内存要求越高。
我的此台Linux服务器是CPU型号,内存16G:

可以安装deepseer-r1 1.5b和deepseek-r1 7b模型,已测试可以。
首先安装deepseek-r1:1.5b模型:
ollama run deepseek-r1:1.5b

会下载r1 1.5b模型一段时间,估计20分钟,1.6G大小左右,成功后出现对话框:

接着安装deepseek-r1:7b模型:
ollama run deepseek-r1:7b
先按Ctrl+D键退出1.5b模型,然后输入:ollama run deepseek-r1:7b

需要下载7b模型,估计要花40分钟~1个小时左右,4.7G大小左右,成功后出现对话框:

注意:在机器性能一定的情况下,模型越大,运行速度越慢,需要用到调优,后期会分享。
如此完成了DeepSeek R1模型的安装。

03
接入Spring AI之前,采用的是Spring Boot构建版本,需要用到Spring Boot 3.3.4版本,JDK 17以上,Maven需要3.6.3版本以上,不然无法正常使用Spring AI功能,本部分示例的代码已开源:https://gitee.com/javagongfu/huaxinfang_audio_translate.git
下面分享接入过程:
SpringBoot版本为:
<parent>
<groupId>org.springframework.boot</groupId>
<artifactId>spring-boot-starter-parent</artifactId>
<version>3.3.4</version>
</parent>
其中properties配置为:
<properties>
<maven.compiler.source>17</maven.compiler.source>
<maven.compiler.target>17</maven.compiler.target>
<lombok.version>1.18.30</lombok.version>
<hutool.version>5.8.28</hutool.version>
</properties>
接入Spring Boot核心坐标:
<dependency>
<groupId>org.springframework.boot</groupId>
<artifactId>spring-boot-starter-web</artifactId>
</dependency>
<!–测试依赖–>
<dependency>
<groupId>org.springframework.boot</groupId>
<artifactId>spring-boot-starter-test</artifactId>
<scope>test</scope>
</dependency>
接入lombok坐标:
<dependency>
<groupId>org.projectlombok</groupId>
<artifactId>lombok</artifactId>
<version>${lombok.version}</version>
</dependency>
由于项目使用了SpringBoot自带的Thymeleaf做界面,开箱即用,需引入Thymeleaf坐标:
<dependency>
<groupId>org.springframework.boot</groupId>
<artifactId>spring-boot-starter-thymeleaf</artifactId>
</dependency>
引入Spring AI功能:
<dependency>
<groupId>org.springframework.ai</groupId>
<artifactId>spring-ai-ollama-spring-boot-starter</artifactId>
<version>1.0.0-M5</version>
</dependency>
项目中要使用Java EE,还需引入Java EE坐标:
<dependency>
<groupId>javax.servlet</groupId>
<artifactId>javax.servlet-api</artifactId>
<version>4.0.1</version>
<scope>provided</scope>
</dependency>
logback日志管理工具需要使用:
<dependency>
<groupId>ch.qos.logback</groupId>
<artifactId>logback-classic</artifactId>
<version>1.4.8</version>
</dependency>
再增加依赖管理器:
<dependencyManagement>
<dependencies>
<dependency>
<groupId>org.springframework.ai</groupId>
<artifactId>spring-ai-bom</artifactId>
<version>1.0.0-M5</version>
<type>pom</type>
</dependency>
</dependencies>
</dependencyManagement>
添加Maven快照:
<!– 快照版本–>
<repositories>
<repository>
<id>spring-milestones</id>
<name>spring-milestones</name>
<url>https://repo.spring.io/milestone</url>
<releases>
<enabled>true</enabled>
</releases>
<snapshots>
<enabled>true</enabled>
</snapshots>
</repository>
</repositories>
项目Maven打包工具:
<!– 打包 –>
<build>
<plugins>
<plugin>
<groupId>org.springframework.boot</groupId>
<artifactId>spring-boot-maven-plugin</artifactId>
<configuration>
<includeSystemScope>true</includeSystemScope>
<fork>true</fork>
</configuration>
</plugin>
</plugins>
</build>
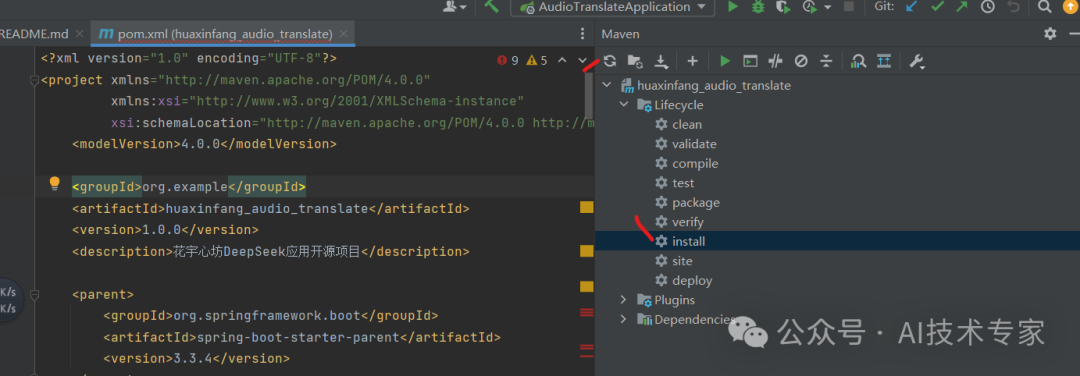
写好Maven pom.xml文件后,在IntelliJ IDEA刷新安装一下:
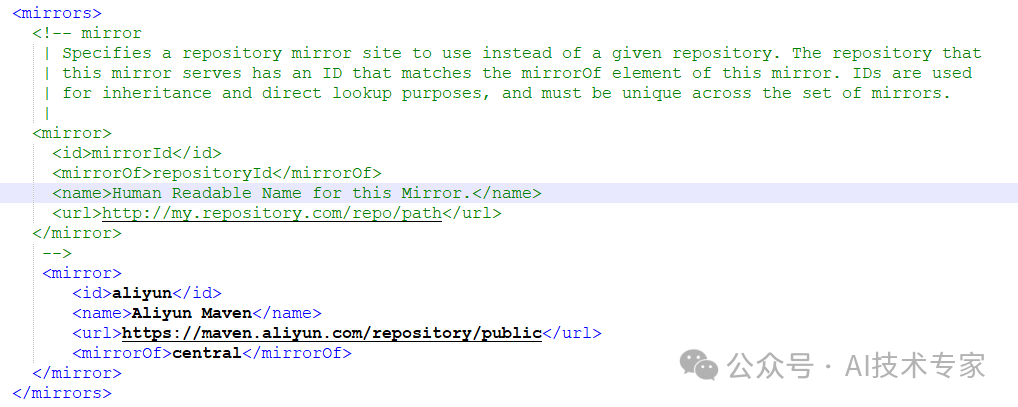
注意:Maven仓库配置需要添加阿里云镜像:
<mirror>
<id>aliyun</id>
<name>Aliyun Maven</name>
<url>https://maven.aliyun.com/repository/public</url>
<mirrorOf>central</mirrorOf>
</mirror>
接着在项目/src/main/resources下新建application.yml和application-dev.yml文件:
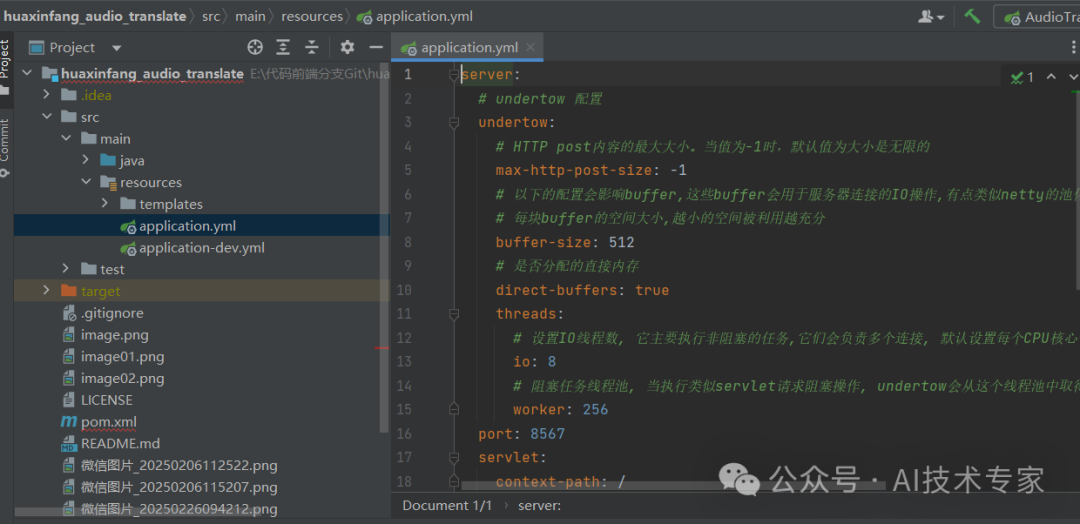
application.yml文件内容:
server:
# undertow 配置
undertow:
# HTTP post内容的最大大小。当值为-1时,默认值为大小是无限的
max-http-post-size: -1
# 以下的配置会影响buffer,这些buffer会用于服务器连接的IO操作,有点类似netty的池化内存管理
# 每块buffer的空间大小,越小的空间被利用越充分
buffer-size: 512
# 是否分配的直接内存
direct-buffers: true
threads:
# 设置IO线程数, 它主要执行非阻塞的任务,它们会负责多个连接, 默认设置每个CPU核心一个线程
io: 8
# 阻塞任务线程池, 当执行类似servlet请求阻塞操作, undertow会从这个线程池中取得线程,它的值设置取决于系统的负载
worker: 256
port: 8567
servlet:
context-path: /
spring:
profiles:
# dev 默认为开发环境 , prod 线上环境
active: dev
application:
name: huaxinfang_audio_translate
main:
allow-bean-definition-overriding: true
servlet:
multipart:
max-file-size: 10MB
max-request-size: 10MB
application-dev.yml文件内容:
parameters:
model: "offline" #离线模型为例
hotWords: "{"自定义":20,"热词":20,"设置":30}"
fileUrl: "D:/Audio"
serverIpPort: "ws://X.X.X.X:10095/"
spring:
ai:
ollama:
base-url: http://X.X.X.X:11434
chat:
enabled: true
options:
model: deepseek-r1:1.5b
temperature: 0.8
keep_alive: 5m
application-dev.yml其中base-url:
http://X.X.X.X:11434
改为您部署的OLLAMA服务器ip地址,OLLAMA服务的端口号默认是11434,如果您的服务器ip是:192.168.3.1,则配置应该为:
base-url: http://192.168.3.1:11434
可以去服务器ip看11434有没有启动:
netstat -an|grep 11434

表示OLLAMA的11434端口对所有ip可用,如果您使用的是云服务器,还需要在云服务器的安全组放开11434端口,防火墙放开11434端口。

在项目/src/main/java目录下新建com.asr.client包
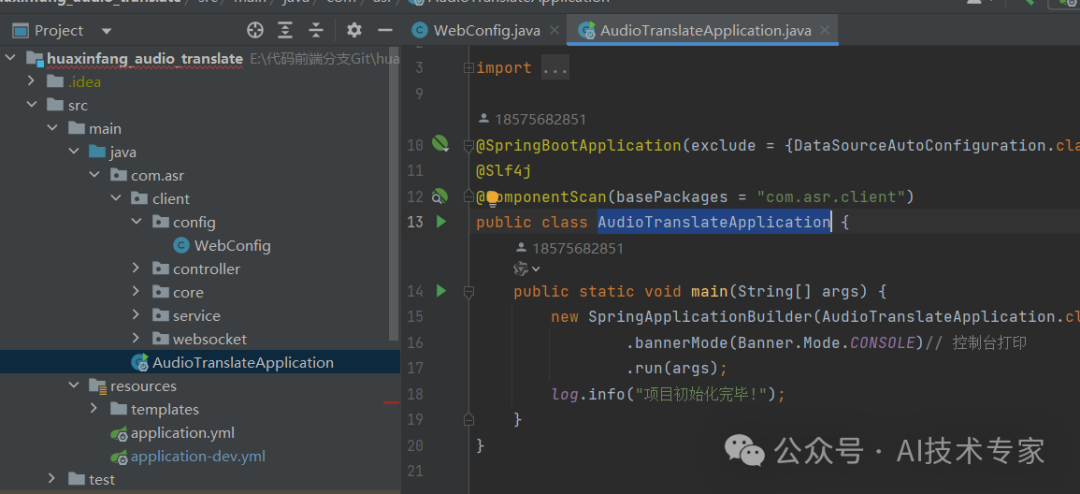
在包下新建AudioTranslateApplication.java文件,作为SpringBoot启动类,内容为:
package com.asr;
import lombok.extern.slf4j.Slf4j;
import org.springframework.boot.Banner;
import org.springframework.boot.autoconfigure.SpringBootApplication;
import org.springframework.boot.autoconfigure.jdbc.DataSourceAutoConfiguration;
import org.springframework.boot.builder.SpringApplicationBuilder;
import org.springframework.context.annotation.ComponentScan;
@SpringBootApplication(exclude = {DataSourceAutoConfiguration.class})
@Slf4j
@ComponentScan(basePackages = "com.asr.client")
public class AudioTranslateApplication {
public static void main(String[] args) {
new SpringApplicationBuilder(AudioTranslateApplication.class)
.bannerMode(Banner.Mode.CONSOLE)// 控制台打印
.run(args);
log.info("项目初始化完毕!");
}
}
接着新建com.asr.client.config包
在config包下新建WebConfig类,内容为:
package com.asr.client.config;
import org.springframework.context.annotation.Configuration;
import org.springframework.web.servlet.config.annotation.AsyncSupportConfigurer;
import org.springframework.web.servlet.config.annotation.WebMvcConfigurer;
/**
● @author AI技术学院
● @version 1.0.1
● @project davinci_audio_translate
● @description
● @date 2025/3/4 10:54:24
*/
@Configuration
public class WebConfig implements WebMvcConfigurer {
@Override
public void configureAsyncSupport(AsyncSupportConfigurer configurer) {
configurer.setDefaultTimeout(3600000); // 1小时超时
}
}
新建com.asr.client.controller包,包下新建OllamaChatController.java文件,内容为:
package com.asr.client.controller;
import jakarta.annotation.PostConstruct;
import lombok.extern.slf4j.Slf4j;
import org.springframework.ai.chat.messages.Message;
import org.springframework.ai.chat.messages.SystemMessage;
import org.springframework.ai.chat.messages.UserMessage;
import org.springframework.ai.chat.model.ChatResponse;
import org.springframework.ai.chat.prompt.Prompt;
import org.springframework.ai.ollama.OllamaChatModel;
import org.springframework.ai.ollama.api.OllamaApi;
import org.springframework.ai.ollama.api.OllamaOptions;
import org.springframework.beans.factory.annotation.Autowired;
import org.springframework.web.bind.annotation.GetMapping;
import org.springframework.web.bind.annotation.RequestMapping;
import org.springframework.web.bind.annotation.RequestParam;
import org.springframework.web.bind.annotation.RestController;
import reactor.core.publisher.Flux;
import java.util.ArrayList;
import java.util.List;
/**
* @author AI技术学院
* @version 1.0.1
* @project davinci-ocr-python
* @description Ollama接口
* @date 2025/2/5 11:20:31
*/
@RequestMapping("/deepseek")
@RestController
@Slf4j
public class OllamaChatController {
private final OllamaChatModel chatModel;
private final List<Message> chatHistoryList = new ArrayList<>();
@Autowired
public OllamaChatController(OllamaChatModel chatModel) {
this.chatModel = chatModel;
}
@PostConstruct
public void init() {
chatHistoryList.add(new SystemMessage("你是一个很好的助手."));
}
/**
@GetMapping("/ai/ollama/generate")
public Map<String,String> generate(@RequestParam(value = "message", defaultValue = "Tell me a joke") String message) {
return Map.of("generation", this.chatModel.call(message));
}
@GetMapping("/ai/ollama/generateStream")
public Flux<ChatResponse> generateStream(@RequestParam(value = "message", defaultValue = "Tell me a joke") String message) {
Prompt prompt = new Prompt(new UserMessage(message));
return this.chatModel.stream(prompt);
}
*/
@GetMapping("/ai/ollama/generate")
public String generate(String message) {
String call = chatModel.call(message);
return call;
}
@GetMapping("/ai/generateStream")
public Flux<ChatResponse> generateStream(@RequestParam(value = "message", defaultValue = "Tell me a joke") String message, @RequestParam(value="model", defaultValue="deepseek-r1:1.5b")String model) {
// chatHistoryList.add(new UserMessage(message));
// Prompt prompt = new Prompt(chatHistoryList, OllamaOptions.create()
// .withModel(model)//使用哪个大模型
// .withTemperature(0.8));
Prompt prompt = new Prompt(new UserMessage(message), OllamaOptions.create()
.withModel(model)//使用哪个大模型
.withTemperature(0.8));
return chatModel.stream(prompt);
}
}
其中OllamaChatModel是实际的Spring AI模型控制者。
自动注入ChatModel:
@Autowired
public OllamaChatController(OllamaChatModel chatModel) {
this.chatModel = chatModel;
}
如果模型为同步调用,可以增加一个聊天历史对话框记录:
private final List<Message> chatHistoryList = new ArrayList<>();
并初始化历史消息角色:
@PostConstruct
public void init() {
chatHistoryList.add(new SystemMessage("你是一个很好的助手."));
}
消息同步调用:
@GetMapping("/ai/ollama/generate")
public String generate(String message) {
String call = chatModel.call(message);
return call;
}
本地运行起来后,可以在PostMan使用:
http://localhost:8567/deepseek/ai/ollama/generate?message=你可以帮我创作一首歌么
查看同步调用结果

在企业实际应用中,应该采用Stream流式打字输出,以下方法还能根据用户传入的模型model参数流式输出结果:
@GetMapping("/ai/generateStream")
public Flux<ChatResponse> generateStream(@RequestParam(value = "message", defaultValue = "Tell me a joke") String message, @RequestParam(value="model", defaultValue="deepseek-r1:1.5b")String model) {
Prompt prompt = new Prompt(new UserMessage(message), OllamaOptions.create()
.withModel(model)//使用哪个大模型
.withTemperature(0.8));
return chatModel.stream(prompt);
}
model参数默认为deepseek-r1:1.5b模型,并设置模型选择和温度temperature:

由于项目采用的开箱即用Thymeleaf前端页面,所以在/src/main/resources下新建templates模板文件夹:
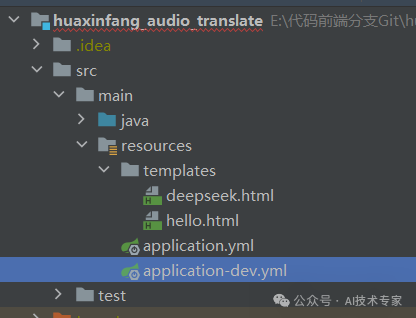
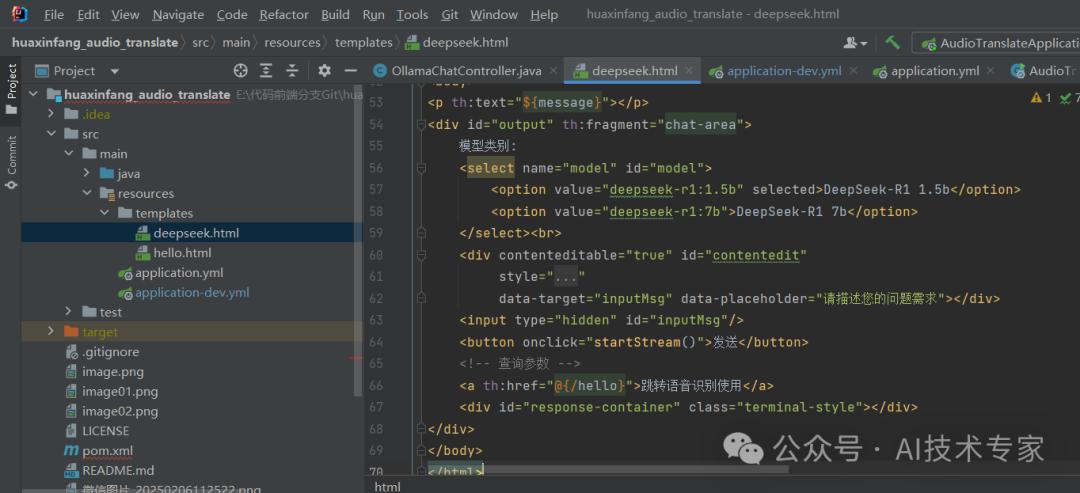
在templates模板文件夹中新建deepseek.html采用Thymeleaf引擎:
代码为:
<!DOCTYPE html>
<html lang="en">
<head>
<meta charset="UTF-8">
<title>DeepSeek R1本地模型</title>
</head>
<style>
.terminal-style {
background: #1e1e1e;
color: #00ff00;
font-family: monospace;
padding: 20px;
height: 400px;
overflow-y: auto;
border-radius: 5px;
}
#inputMsg {
padding: 10px;
height: 50px;
}
#model {
margin-bottom: 20px;
}
[data-placeholder]:empty:before {
content: attr(data-placeholder);
color: #888;
pointer-events: none;
display: block; /* 用于换行 */
}
</style>
<script>
function startStream() {
const message = document.getElementById('contentedit').innerText;
const eventSource = new EventSource(`/deepseek/ai/generateStream?message=${encodeURIComponent(message)}&model=${document.getElementById('model').value}`);
const container = document.getElementById('response-container');
container.innerHTML = '';
eventSource.onmessage = function(e) {
const response = JSON.parse(e.data);
console.log('respose:'+response.result.output.content);
container.innerHTML += response.result.output.content;
container.scrollTop = container.scrollHeight; // 自动滚动
};
eventSource.onerror = () => {
eventSource.close();
// container.innerHTML += "<br>连接已关闭";
};
}
// document.getElementById('contentedit').addEventListener('input', function() {
// document.getElementById('inputMsg').value = this.innerText;
// });
</script>
<body>
<p th:text="${message}"></p>
<div id="output" th:fragment="chat-area">
模型类别:
<select name="model" id="model">
<option value="deepseek-r1:1.5b" selected>DeepSeek-R1 1.5b</option>
<option value="deepseek-r1:7b">DeepSeek-R1 7b</option>
</select><br>
<div contenteditable="true" id="contentedit"
style="border:1px solid #ccc; padding:15px"
data-target="inputMsg" data-placeholder="请描述您的问题需求"></div>
<input type="hidden" id="inputMsg"/>
<button onclick="startStream()">发送</button>
<!– 查询参数 –>
<a th:href="@{/hello}">跳转语音识别使用</a>
<div id="response-container" class="terminal-style"></div>
</div>
</body>
</html>
前端代码不细讲,拷贝进deepseek.html即可:
在com.asr.client.controller包下新建HelloController.java文件,增加:
package com.asr.client.controller;
import cn.hutool.core.io.FileUtil;
import cn.hutool.core.lang.UUID;
import cn.hutool.json.JSONObject;
import cn.hutool.json.JSONUtil;
import com.asr.client.core.exception.ServiceException;
import com.asr.client.service.RecognitionService;
import lombok.extern.slf4j.Slf4j;
import org.springframework.beans.factory.annotation.Autowired;
import org.springframework.beans.factory.annotation.Value;
import org.springframework.stereotype.Controller;
import org.springframework.ui.Model;
import org.springframework.web.bind.annotation.GetMapping;
import org.springframework.web.bind.annotation.PostMapping;
import org.springframework.web.multipart.MultipartFile;
import org.springframework.web.socket.*;
import org.springframework.web.socket.client.standard.StandardWebSocketClient;
import java.io.File;
import java.io.IOException;
import java.net.URI;
import java.util.concurrent.CountDownLatch;
import java.util.concurrent.TimeUnit;
/**
* @author AI技术学院
* @version 1.0.1
* @project davinci_audio_translate
* @description 接口
* @date 2025/2/26 09:19:07
*/
@Controller
@Slf4j
public class HelloController {
@GetMapping("/deepseek")
public String deepseek(Model model) {
model.addAttribute("message", "DeepSeek R1本地模型阉割版");
return "deepseek";
}
}
其中@Controller说明是一个页面控制器。
@GetMapping("/deepseek")
public String deepseek(Model model) {
model.addAttribute("message", "DeepSeek R1本地模型阉割版");
return "deepseek";
}
方法尾return "deepseek"定位到deepseek.html模板页。
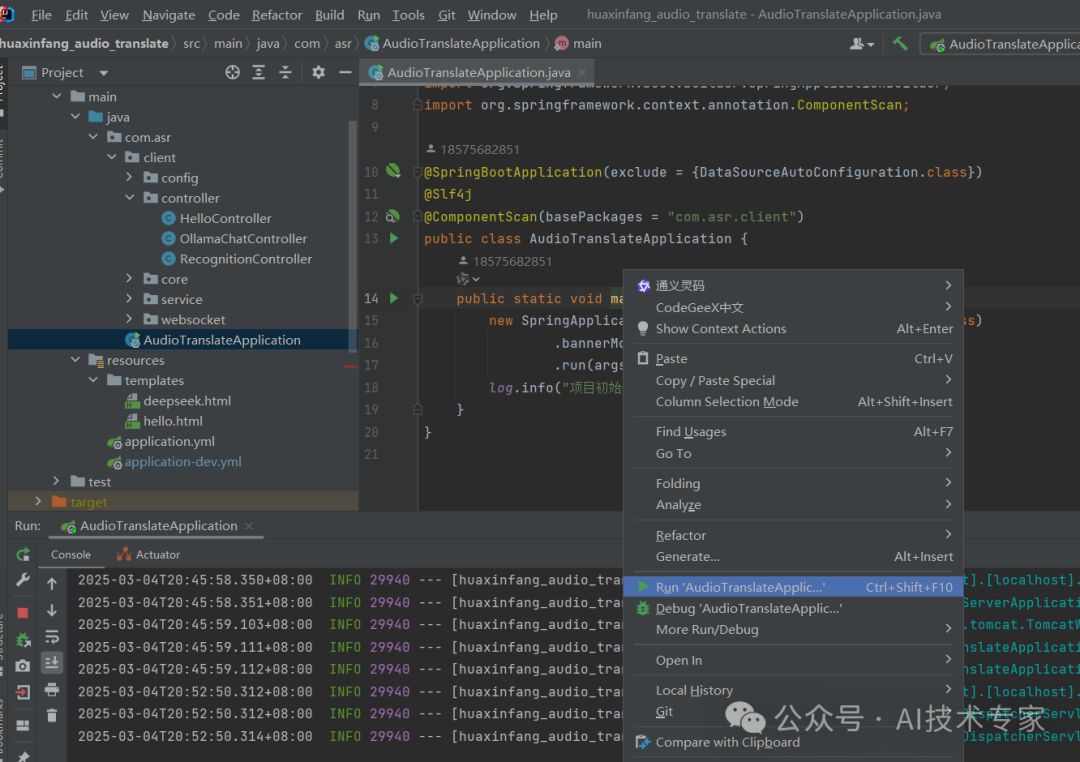
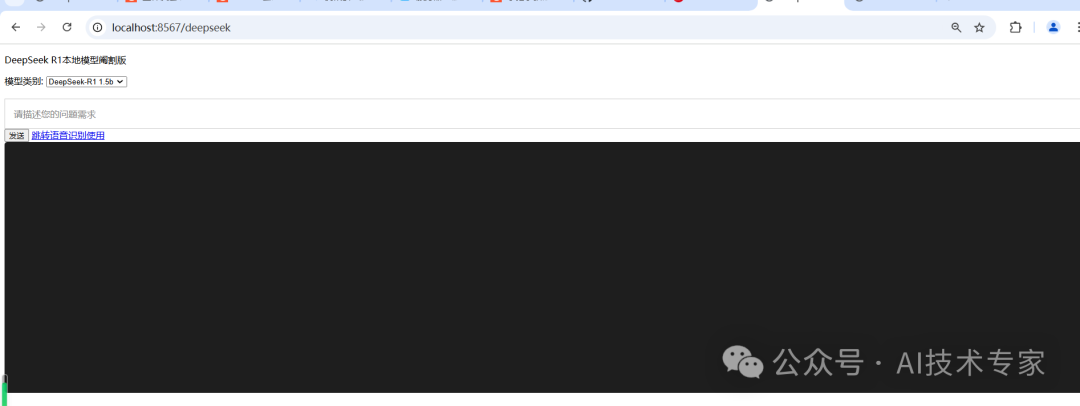
在AudioTranslateApplication运行起来后
本地浏览器输入:http://localhost:8567/deepseek
出现工具页面
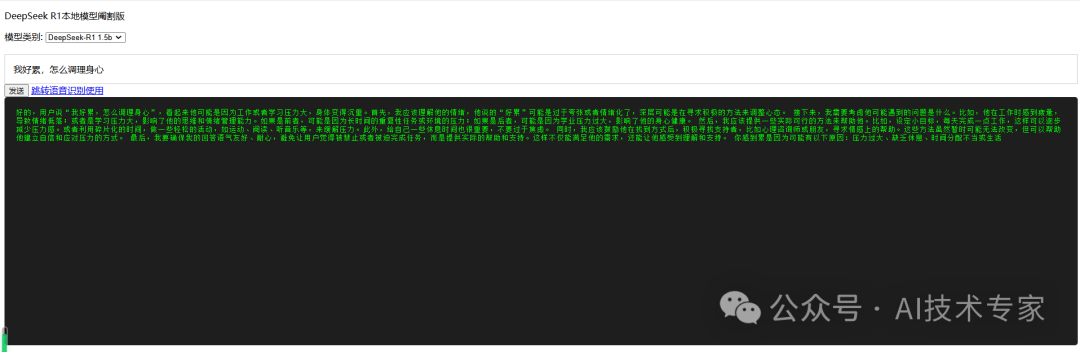
先选择1.5b模型,输入描述:
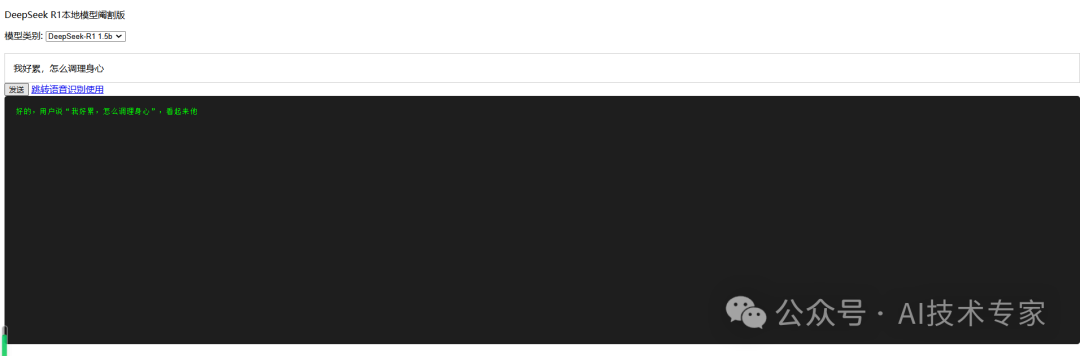
可以看到逐字输出:
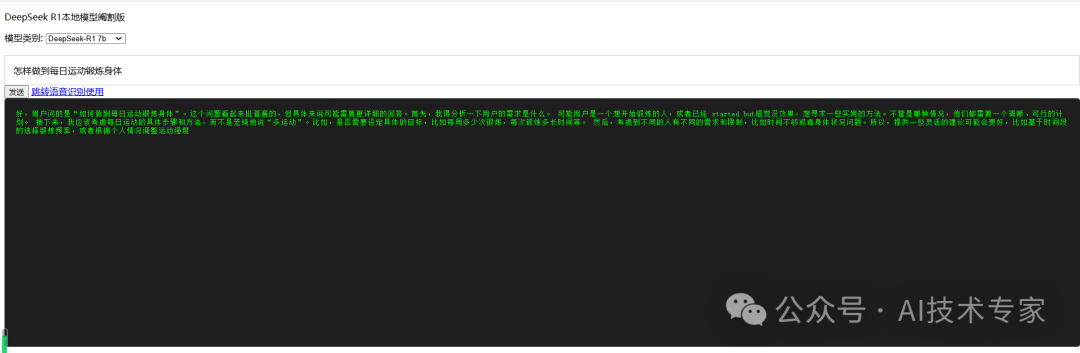
再切换成7b模型,输入描述,速度会更慢,模型更大:

响应时间更长:
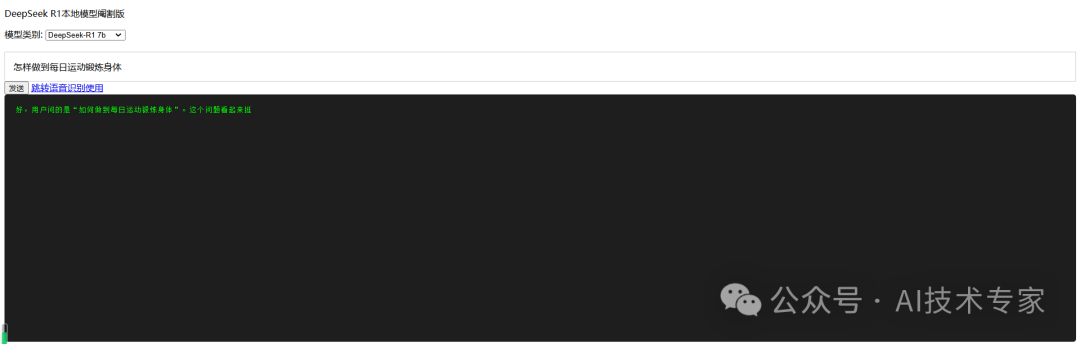
也是逐字打印:
本代码示例仓库https://gitee.com/javagongfu/huaxinfang_audio_translate.git
还包含阿里达摩院FunASR语音识别使用,有兴趣的可以按照README安装FunASR,接入项目使用,有详细说明。
