

背景与挑战
dify 作为一款低代码 AI 应用开发平台,凭借其直观的可视化工作流编排能力,极大降低了大模型应用的开发门槛。然而,在实际企业级落地过程中,我们发现其原生能力仍存在两个关键瓶颈:
代码执行能力受限:Dify 内置的 Sandbox 节点虽支持基础 Python 代码执行,但无法安装自定义 Python 包,难以支撑复杂的业务逻辑、数据处理或算法调用;
缺乏自动化调度机制:Dify 原生架构不支持 Agent 或 Agentic Workflow 的定时触发、周期性运行与依赖编排,导致其难以融入企业级自动化运维体系。
这两个问题严重制约了 Dify 在生产环境中的深度应用——尤其当我们希望构建一个具备“感知-决策-执行-反馈”闭环能力的智能 Agent 时,仅靠 Dify 自身往往力不从心。
为突破这些限制,我们在实践中探索出一套 “Dify + DMS Notebook + DMS Airflow”三位一体的一站式增强开发架构,有效补齐了 Dify 在执行能力与调度能力上的短板:
✅ DMS Notebook:提供完整、可定制的 Python 运行环境,支持第三方库安装、交互式开发与复杂逻辑实现,作为 Dify Sandbox 的强力补充;
✅ DMS Airflow:作为统一调度引擎,实现对 Dify 工作流、Notebook 脚本或 Agent 任务的定时触发、依赖管理与可靠执行;
✅ DMS 平台集成:实现从开发、调试、部署到调度、监控的全链路闭环管理,显著提升 Dify 在企业场景下的工程化落地能力。
本文将以一个销售数据分析机器人的完整开发案例,详细介绍如何基于 DMS 平台,构建一个可调度、可扩展、可运维的 Agent 系统。
使用 DMS Notebook 扩展 Dify 的代码执行能力
为什么需要 Notebook?
在 Dify 中,若需调用 Pandas 进行数据清洗、使用 Prophet 做时间序列预测,或集成企业内部 SDK,Sandbox 节点往往无能为力。而 DMS Notebook 提供了完整的 Python 环境,支持:
自定义 pip 包安装;
环境变量配置(如 AK/SK、API Key);
异步服务开发(如 FastAPI);
与 VPC 内其他服务安全互通。
这使其成为 Dify 外部能力扩展的理想“执行单元”。
步骤详解:构建一个销售数据分析 API 服务
1.创建 DMS Notebook 会话
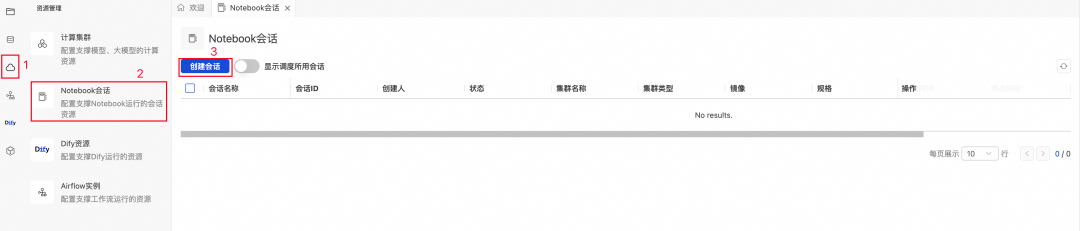
进入 DMS 控制台 > Notebook 会话 > 创建会话;
各参数的定义如下:

选择合适的 Python 镜像版本;
在 配置 > 编辑设置 中:
PyPI 包管理:按 requirements.txt 格式填入依赖(如 pandas,fastapi,uvicorn,nest-asyncio);
环境变量:设置 ALIBABACLOUDACCESSKEYID、ALIBABACLOUDACCESSKEYSECRET、大模型 API Key 等;
关键配置:
fastapi、uvicorn、nest-asyncio库是必须要安装的;
设置 资源释放时间 = 0(防止服务被自动释放);
设置环境变量 DMSKERNELIDLE_TIMEOUT=0(避免 Jupyter Kernel 因空闲被 kill)。
💡踩坑提示:若未设置 DMSKERNELIDLE_TIMEOUT=0,长时间运行的 API 服务可能在空闲数分钟后被系统回收,导致后续调用失败。
创建完成后,在notebook会话窗口中点击启动即可
2.编写并启动 FastAPI 服务
点击文件夹图标,右键点击 default(默认库),再点击 新建Notebook文件。
在代码块中编写相关的python代码,可以参考以下模板构建你的API服务,更多FastAPI相关的使用方法请查看官方文档:https://fastapi.tiangolo.com/
import osfrom fastapi import FastAPI, HTTPException, Request, File, UploadFile, Path, Query, Form, Headerfrom fastapi.staticfiles import StaticFilesfrom typing import Optionalimport nestasyncioimport asyncioimport httpximport io'''注意,Jupyter本身就在一个asyncio事件循环中运行。我们不能在已有循环中直接运行另一个循环,但nestasyncio这个库可以“打补丁”,允许我们这样做。'''nestasyncio.apply()app = FastAPI(title="Your Service Name", description="Description of Your Service")# 创建static目录(如果不存在)staticdir = "static"ifnot os.path.exists(staticdir): os.makedirs(staticdir)# 挂载静态文件服务app.mount("/static", StaticFiles(directory=staticdir), name="static")@app.get("/")async def root(): """ 根节点,返回服务基本信息 # — 如何使用 curl 调用 — curl -X GET "http://127.0.0.1:8000/" """ return { "message": "Service is running", "documentation": "/docs", "note": "…" }@app.post("/process-data/{itemid}")async def processdata( request: Request, # 使用 Request 对象来接收原始请求 # 路径参数 itemid: int = Path(…, title="物品ID", ge=1), # 查询参数 ispremium: bool = Query(False, description="是否为高级物品"), # 请求头参数 xtoken: Optional[str] = Header(None, description="自定义的认证Token")): """ 接收 JSON 请求体、路径参数、查询参数和请求头。 # — 如何使用 curl 调用 — # -X POST: 指定请求方法 # URL: 包含路径参数 {itemid} 和查询参数 ?ispremium=true # -H: 添加请求头 (Header) # -d: 发送请求体 (Body),这里是 JSON 字符串 curl -X POST "http://127.0.0.1:8000/process-data/101?ispremium=true" -H "Content-Type: application/json" -H "X-Token: my-secret-token" -d '{"name": "笔记本电脑", "price": 7999.9, "tags": ["electronics", "office"]}' """ if xtoken != "my-secret-token": raise HTTPException(statuscode=401, detail="X-Token 无效") try: # 手动解析 JSON 请求体 jsonbody = await request.json() name = jsonbody.get("name") price = jsonbody.get("price") # 你的业务逻辑代码 if not name or not price: raise HTTPException(statuscode=400, detail="请求体中缺少 'name' 或 'price'") return { "message": "数据处理成功", "receiveddata": { "itemid": itemid, "ispremium": ispremium, "xtoken": xtoken, "body": jsonbody } } except Exception as e: raise HTTPException(statuscode=500, detail=f"服务执行错误: {str(e)}")@app.post("/upload-file")async def uploadfile( # 表单数据 token: str = Form(…), # 上传文件 file: UploadFile = File(…)): """ 通过表单(form-data)上传文件和附带的文本信息。 # — 如何使用 curl 调用 — # -F: 用于发送 multipart/form-data # -F "file=@/path/to/your/file.txt": @符号表示后面是文件路径,curl会读取该文件内容作为上传数据 # -F "token=user123": 发送一个名为 token 的表单字段 # 注意: 请将 /path/to/your/file.txt 替换为你的本地文件真实路径 curl -X POST "http://127.0.0.1:8000/upload-file" -F "file=@./testupload.txt" -F "token=my-form-token" """ # 为了让curl示例能工作,我们先创建一个示例文件 if not os.path.exists("testupload.txt"): with open("testupload.txt", "w") as f: f.write("This is a test file for curl upload.") try: contents = await file.read() filelocation = os.path.join(staticdir, file.filename) with open(filelocation, "wb") as f: f.write(contents) return { "message": "文件上传成功!", "token": token, "filename": file.filename, "filesize": len(contents), "fileurl": f"/static/{file.filename}" } except Exception as e: raise HTTPException(statuscode=500, detail=f"文件处理错误: {str(e)}")@app.get("/status")async def getserverstatus(): """ 获取服务器状态。 # — 如何使用 curl 调用 — curl -X GET "http://127.0.0.1:8000/status" """ return {"status": "running"}async def runserver(host="127.0.0.1", port=8000): """在后台运行uvicorn服务器""" import uvicorn config = uvicorn.Config(app, host=host, port=port, loglevel="info") server = uvicorn.Server(config) # uvicorn.run() 是一个阻塞调用,所以我们用更底层的Server.serve() await server.serve()task = asyncio.createtask(runserver(host="0.0.0.0", port=8000))# 等待服务启动await asyncio.sleep(2)# 创建一个异步HTTP客户端async with httpx.AsyncClient() as client: print("正在向 http://127.0.0.1:8000/status/ 发送请求…") # 发送POST请求 response = await client.get("http://127.0.0.1:8000/status") # 打印结果 if response.status_code == 200: print("服务启动成功") else: print("服务启动失败,请检查报错信息")
接下来我们以构建一个单日销售数据分析的API为例,代码内容如下:
import osimport pandas as pdfrom fastapi import FastAPI, HTTPException, Request, File, UploadFilefrom fastapi.staticfiles import StaticFilesimport nestasyncioimport asyncioimport httpximport io'''注意,Jupyter本身就在一个asyncio事件循环中运行。我们不能在已有循环中直接运行另一个循环,但nestasyncio这个库可以“打补丁”,允许我们这样做。'''nestasyncio.apply()app = FastAPI(title="Sales Data Analysis Service", description="Provides data analysis and chart generation capabilities for Dify")# 创建static目录(如果不存在)staticdir = "static"ifnot os.path.exists(staticdir):os.makedirs(staticdir)# 挂载静态文件服务app.mount("/static", StaticFiles(directory=staticdir), name="static")def loadsalesdatafromfile(filecontent: bytes):"""从上传的文件内容加载销售数据"""try:# 将字节内容转换为StringIO对象csvstring = filecontent.decode('utf-8')df = pd.readcsv(io.StringIO(csvstring))“# 验证必要的列是否存在requiredcolumns = ['Date', 'Product', 'Price', 'Amount', 'Region']ifnot all(col in df.columns for col in requiredcolumns):raise ValueError(f"CSV file must contain columns: {', '.join(requiredcolumns)}")“# 转换数据类型df['Date'] = pd.todatetime(df['Date'])df['Price'] = pd.tonumeric(df['Price'], errors='coerce')df['Amount'] = pd.tonumeric(df['Amount'], errors='coerce')“# 计算销售额 (Sales = Price × Amount)df['Sales'] = df['Price'] * df['Amount']“return dfexcept Exception as e:raise HTTPException(statuscode=500, detail=f"Error processing CSV file: {str(e)}")@app.get("/")async def root():"""Root endpoint, returns service information"""return {"message": "Sales Data Analysis Service is running","documentation": "/docs","endpoints": ["POST /analysis/dailysaleanalysis"],"note": "Require a CSV file upload with columns: Date, Product, Price, Amount, Region"}@app.post("/analysis/dailysaleanalysis")async def dailysaleanalysis(file: UploadFile = File(…)):"""当日销售数据分析 – 分析上传文件中的销售数据"""try:# 验证文件类型ifnot file.filename.endswith('.csv'):raise HTTPException(statuscode=400, detail="文件必须是CSV格式")“# 读取上传的文件filecontent = await file.read()df = loadsalesdatafromfile(filecontent)“# 获取数据中的日期范围df['Date'] = pd.todatetime(df['Date']).dt.dateuniquedates = sorted(df['Date'].unique())“if len(uniquedates) == 0:raise HTTPException(statuscode=400, detail="数据文件中没有有效的日期数据")“# 如果有多个日期,取最新的日期作为分析目标targetdate = uniquedates[-1] if len(uniquedates) > 1else uniquedates[0]“# 筛选目标日期的数据dailydata = df[df['Date'] == targetdate].copy()“if dailydata.empty:raise HTTPException(statuscode=400, detail=f"没有找到日期 {targetdate} 的销售数据")“# 基础统计totalsales = dailydata['Sales'].sum()totalorders = len(dailydata)totalquantity = dailydata['Amount'].sum()avgordervalue = totalsales / totalorders if totalorders > 0else0“# 产品分析productanalysis = dailydata.groupby('Product').agg({'Sales': 'sum','Amount': 'sum','Price': 'mean'}).round(2)“# 按销售额排序,取前5名产品topproducts = productanalysis.sortvalues('Sales', ascending=False).head(5)topproductslist = []for product, row in topproducts.iterrows():topproductslist.append({"product": product,"sales": float(row['Sales']),"quantity": int(row['Amount']),"avgprice": float(row['Price'])})“# 地区分析regionanalysis = dailydata.groupby('Region').agg({'Sales': 'sum','Amount': 'sum'}).round(2)“# 按销售额排序topregions = regionanalysis.sortvalues('Sales', ascending=False)regionlist = []for region, row in topregions.iterrows():regionlist.append({"region": region,"sales": float(row['Sales']),"quantity": int(row['Amount']),"percentage": round(float(row['Sales']) / totalsales * 100, 2)})“# 价格区间分析dailydata['pricerange'] = pd.cut(dailydata['Price'],bins=[0, 100, 500, 1000, 5000, float('inf')],labels=['0-100', '100-500', '500-1000', '1000-5000', '5000+'])“pricerangeanalysis = dailydata.groupby('pricerange').agg({'Sales': 'sum','Amount': 'sum'}).round(2)“priceranges = []for pricerange, row in pricerangeanalysis.iterrows():ifnot pd.isna(row['Sales']) and row['Sales'] > 0:priceranges.append({"range": str(pricerange),"sales": float(row['Sales']),"quantity": int(row['Amount'])})“# 生成洞察分析insights = []“# 销售额洞察if totalsales > 100000:insights.append(f"当日销售表现优秀,总销售额达到 {totalsales:,.2f} 元")elif totalsales > 50000:insights.append(f"当日销售表现良好,总销售额为 {totalsales:,.2f} 元")else:insights.append(f"当日销售额为 {totalsales:,.2f} 元,可能需要关注销售策略")“# 产品洞察if len(topproductslist) > 0:bestproduct = topproductslist[0]insights.append(f"最佳销售产品是 {bestproduct['product']},销售额 {bestproduct['sales']:,.2f} 元")“# 地区洞察if len(regionlist) > 0:bestregion = regionlist[0]insights.append(f"销售表现最佳的地区是 {bestregion['region']},占总销售额的 {bestregion['percentage']}%")“# 订单洞察if avgordervalue > 1000:insights.append(f"平均订单价值较高,为 {avgordervalue:,.2f} 元,显示客户购买力强")“return {"analysisdate": str(targetdate),"summary": {"totalsales": round(float(totalsales), 2),"totalorders": int(totalorders),"totalquantity": int(totalquantity),"averageordervalue": round(float(avgordervalue), 2)},"topproducts": topproductslist,"regionanalysis": regionlist,"pricerangeanalysis": priceranges,"insights": insights,"datainfo": {"daterange": f"{uniquedates[0]} 到 {uniquedates[-1]}"if len(uniquedates) > 1else str(uniquedates[0]),"totalrecords": len(dailydata),"uniqueproducts": len(dailydata['Product'].unique()),"uniqueregions": len(dailydata['Region'].unique())}}“except HTTPException:raiseexcept Exception as e:raise HTTPException(statuscode=500, detail=f"当日销售数据分析错误: {str(e)}")@app.get("/status")async def getserverstatus():"""获取服务器状态"""try:return {"status": "running"}except Exception as e:raise HTTPException(statuscode=500, detail=f"Error getting server status: {str(e)}")async def runserver(host="127.0.0.1", port=8000):"""在后台运行uvicorn服务器"""import uvicornconfig = uvicorn.Config(app, host=host, port=port, loglevel="info")server = uvicorn.Server(config)# uvicorn.run() 是一个阻塞调用,所以我们用更底层的Server.serve()await server.serve()task = asyncio.createtask(runserver(host="0.0.0.0", port=8000))# 等待服务启动await asyncio.sleep(2)# 创建一个异步HTTP客户端async with httpx.AsyncClient() as client:print("正在向 http://127.0.0.1:8000/status/ 发送请求…")“# 发送POST请求response = await client.get("http://127.0.0.1:8000/status")“# 打印结果if response.status_code == 200:print("服务启动成功")else:print("服务启动失败,请检查报错信息")
✅异步支持:Jupyter 内置 asyncio 事件循环,可直接使用 async/await。
运行相关代码块,可以在输出部分看到API服务启动成功;
查看IP地址
在notebook代码块中,可以使用英文感叹号+终端命令的形式来执行命令,你也可以使用!pip install xxx 来安装额外需要的python包。接下来新建一个代码块,在代码块中输入!ifconfig 并点击运行查看该 Notebook 会话 在VPC中的IP地址,图中 172.16.0.252 即为所需的IP地址,API 服务地址即为:http://172.16.0.252:8080/analyze_sales
在Dify on DMS实例中访问服务
现在我们使用这份模拟销售数据文件来访问API服务:
在工作流中添加HTTP请求节点:
通过 http://:<端口>/xxx 访问创建的API的服务,并在 BODY 中传入相应的参数;
测试运行可以看到该请求成功返回了响应的输出;
你也可以在Notebook会话中看到相应的服务被调用;
接下来以该Dify工作流为例子进行完整的服务调用;
在钉钉群组中添加一个自定义的机器人,并参考https://open.dingtalk.com/document/orgapp/robot-overview 了解如何获取钉钉机器人的accesstoken和signsecret
在填写完你的钉钉机器人参数之后,点击右上角的 运行-》从本地上传 上传示例的销售数据,并点击开始运行;
钉钉群中的机器人成功发送了对该销售数据的分析报告;
点击右上角的 发布-》发布更新 发布工作流用于后面的定时调用;
使用 DMS Airflow 实现定时调度
创建DMS Airflow实例
参照以下链接在DMS中创建Airflow实例
https://help.aliyun.com/zh/dms/purchase-airflow-resources
https://help.aliyun.com/zh/dms/create-and-manage-an-airflow-instance
更多关于Airflow的操作,参照https://airflow.apache.org/docs/apache-airflow/stable/index.html
编写 DAG:每日自动触发销售分析
以下是示例的python代码,用于定时调用Dify工作流的APIimport pendulumimport requestsimport jsonfrom airflow.models.dag import DAGfrom airflow.operators.python import PythonOperatorfrom airflow.models import VariableCSVFILEPATH = "/yourpath/dailysaledata.csv"DIFYAPIURL = "https://dify-dms.aliyuncs.com/v1" # 替换成你的 Dify Workflow API URL# 从 Airflow Variable 中安全地获取 API KeyDIFYAPIKEY = Variable.get("difyapikey")APPAPIKEY= Variable.get("appapikey")def calldifyworkflowwithcsv(kwargs):"""读取 CSV 文件内容,并将其作为文件上传调用 Dify 工作流。"""print(f"准备从 '{CSVFILEPATH}' 读取文件…")try:with open(CSVFILEPATH, 'rb') as f:filestoupload = {'file': ('dailysaledata.csv', f, 'document/csv')}# 准备 API 请求的 headers 和 bodyheaders = {'Authorization': f'Bearer {APPAPIKEY}','DifyApiKey': f'{DIFYAPIKEY}',}““fileuploadresponse=requests.post(DIFYAPIURL+'/files/upload',headers=headers,data={'user': 'airflow-user-demo'},files=filestoupload,)print(fileuploadresponse.json())“fileid=fileuploadresponse.json().get('id')headers.update({'Content-Type': 'application/json'})“# 'inputs' 通常是json字符串# 'user' 是必须的,代表最终用户的标识符inputdata = {'salesdata': {"type": "document","transfermethod": "localfile","uploadfileid": fileid}}data = {'inputs': inputdata,'user': 'airflow-user-demo','responsemode': 'blocking',}print("开始调用 Dify API…")print(f"URL: {DIFYAPIURL}")“response = requests.post(DIFYAPIURL+'/workflows/run',headers=headers,json=data,)“# 检查请求是否成功response.raiseforstatus()“print(f"API 调用成功!状态码: {response.statuscode}")“# 打印响应内容print("— Dify API Response —")“print(response.json()["data"]["outputs"]["answer"])“print("n— End of Response —")“# 你也可以将完整的响应推送到 XComs,以便下游任务使用# ti = kwargs['ti']# ti.xcompush(key='difyresponse', value=fullresponse)except FileNotFoundError:print(f"错误:文件未找到于 '{CSVFILEPATH}'")raiseexcept requests.exceptions.RequestException as e:print(f"API 调用失败: {e}")raisewith DAG(dagid="difyworkflow",startdate=pendulum.datetime(2023, 10, 27, tz="Asia/Shanghai"),# '0 8 * * *' 代表每天早上8:00 (UTC+8)# Airflow 默认使用 UTC,但 Cron 表达式本身不带时区,调度器会根据 DAG 的时区设置来解释schedule="0 8 * * *",catchup=False,tags=["dify", "api", "example"],docmd="""### Dify 工作流调用 DAG此 DAG 每天早上8点执行,它会:1. 从本地文件系统读取一个 CSV 文件。2. 将该 CSV 文件作为附件,调用一个 Dify 工作流。3. 打印出 Dify API 的响应。""") as dag:rundifyworkflow = PythonOperator(taskid="calldify",pythoncallable=calldifyworkflowwith_csv,)
📌注意:通过API调用Dify工作流中想要上传本地文件,需要先通过/files/upload 接口传入相应的文件获取文件id,再将文件id传入工作流中。
创建完成后打开Airflow实例,可以看到创建的定时任务;
每日 8:00,系统自动调用 Dify 工作流,最终由钉钉机器人推送分析报告;
总结与思考
通过 DMS Notebook + DMS Airflow 对 Dify 的能力扩展,我们成功构建了一个具备以下特性的企业级 Agent 开发范式:
这套方案不仅解决了 Dify 当前的局限性,更重要的是,它保留了 Dify 的低代码优势,同时通过与成熟数据基础设施(Notebook + Airflow)的深度集成,实现了 “敏捷开发”与“工程可靠”的平衡。
🌟核心理念:Agent 的价值不在于“全自动”,而在于“可扩展、可调度、可运维”。真正的生产级智能系统,一定是平台能力与工程实践的结合体
